... but in a good sense!
I started this week's work by examining the post office from all angles to determine where it wanted me to go next. For a few days it was apparently not speaking to me - I must have done something to tick it off! Then, finally it relented and told me it would like to see some progress on its interior. Apparently it was feeling naked and frumpy and needed a pick-me-up.
So, after painting some baseboards and other trims strips white, I started to dress those poor naked walls. First thing - I papered the walls in the back room. I wanted them to look very different from the front of the shop so ended up with a paper that reminded me of an aged, worn wall with character and patina.
I really liked the look but the post office was keeping its feelings to itself for the time being so I moved on to the walls in the front room. This is where I remind you about my aversion to pre-planning. I immediately glued in the baseboard and an upper trim at the height I thought looked "right". Then I put vertical trim down the corners between the two horizontal trims. At that point I stood back to have a look and thought there was something missing. So I decided to give it a little bit of "Arts & Crafts" style. Instead of planning out the grid, I took 3 of the larger squares from a bag of "Woodsies" and used them as spacers on top of the baseboard so I could glue a middle trim horizontally across the wall. It looked good. Then I used one of the squares as a spacer to put small vertical pieces in between this new trim and the baseboard. Again - looked good...however...the space between the middle and upper trim seemed too large and unbalanced. So I used the square as a spacer again and put in another horizontal trim and repeated the steps for the little vertical divider. Hmmm....now I was left with a very small space between the two top trims. Okay - that looked weird. But what would happen if I cut little pieces to go in this space from one side to the other? Let's see. YES, it worked!!! I really liked it and so did the post office. It asked me to hurry up and finish the other side wall. Here is the end result after painting, etc.
When I really looked at what I had done, I was so surprised to see that the little pieces at the top actually ended up with one in the middle of every vertical divider below. How did I manage to make that happen?? I attribute it to that golden horseshoe I was talking about in a previous post. So, I repeated the treatment on the other wall and did a little happy dance. I am back in the good books with my post office now.
While looking at this new wall treatment I tried to visualize what kind of wall sconces would look right in the front office space. I did some searching online through life-size lighting options and found one I thought would look best. I gathered materials and got to work. I made a single sconce as a trial, liked how it worked out, and made 5 more. I will be installing 3 on each side, after all, we're talking the North Pole here. While it is called the "Land of the Midnight Sun", that is only for 6 months of the year. The other 6 months is perpetual night so they can use all the light they can get!
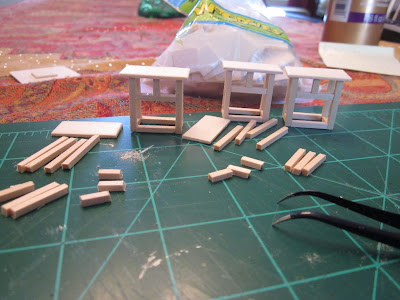
I started by taking the middle size of "Woodsie" and cutting it into two equal pieces. These will be tops for the wall sconces.
Then I cut 1/8" square stripwwod into the following sizes: 4- 1" lengths; 3- 1/4" lengths; and 3- 11/16" lengths. The 1" lengths formed the four corners of my sconces, the 11/16" are the spacers between the front and back corner pairs(2 between the front uprights, 1 at the bottom of the back uprights). The shortest lengths are the side spacers and the small vertical piece in the front. When putting it all together I made sure the back frame was even with the back of the top, leaving a hang over section on the two sides and the front.
Here I am during the process....
and after I had finished all six and had them painted white to stand out against the red wall.
See the two little, unpainted ones at the top of that picture? I liked the sconces well enough that I thought I should make two similar, narrow ones for either side of the mirror cabinet in the employee bathroom. Of course, in my typical style, I just went ahead and made them. Then I found out they won't fit!! There's not enough room between the cabinet and the wall. I will have to find another place to put them but that shouldn't be a problem, I hope.
I still have to decide what to use for the inner "glass" in the wall sconces before I show you the finished pieces and how I will be lighting them up. That should be next weeks post, if all goes well.
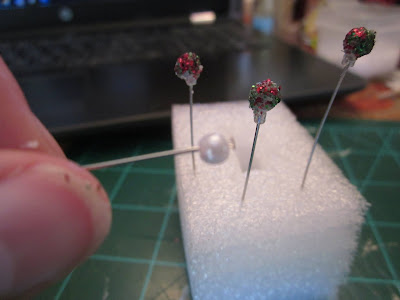
I'll leave you this week with just one more little thing. I needed door handles for the employee bathroom doors and for the mail cabinet in the front office space but couldn't decide what to use. I wanted something a little Christmas-like and fun. In the end, I took small pearls on the end of bead pins, covered them in glue, and rolled them in red, green and white sparkles. When they were dry I glued a seed bead under each "knob" to act as a spacer. After that, I poured some clear nail polish into a top from an old pill bottle and dipped each knob into the nail polish to coat the sparkles and add a clear finish to them. I was quite happy with how they turned out in the end.
I installed them on the bathroom doors and on the mail cabinet.
I set the cabinet in place to test it out. I like it!
On to another task. In the meantime, I hope you are all enjoying some mini time yourselves. I don't want to be the only one having fun here! Keep safe, keep healthy and keep mini-ing! TTFN!!! - Marilyn D.


Love the look of the light sconces, Marilyn. Would packaging plastic work for your lights? As you see this project as the first of many, maybe the narrower sconces would work as outdoor lighting in another one? I sort of see them flanking a door....
ReplyDeleteThanks, Marijke. Yes, I will be using plastic packaging but don't want it to be clear so am toying with options to make it opaque. I'm going to try out a couple of things and see which works best. Yes, I do like the narrow sconces as well so should be able to find one of the North Pole Series projects it will work in. Keep mini-ing! Cheers!- Marilyn D.
DeleteWhat a fun project. I am enjoying watching your progress.
ReplyDeleteThank you, Troy. I know you're a big fan of Christmas too as in your blog I've seen the lengths you go to for your Christmas display in your own home - simply amazing. Ahh, Christmas - best time of the year if it wasn't for all that cold and snow! And yet here I am doing a North Pole series. Go figure! Cheers! - Marilyn D.
DeleteMe encanta lo que estás haciendo.
ReplyDelete
DeleteGracias Isabel. Me estoy divirtiendo mucho trabajando en la oficina de correos. ¡Grandes abrazos! - Marilyn D.
Wow that looks really great! I love the wainscoting and your cabinet pulls are so festive and sweet!
ReplyDeleteThank you, Sheila. I do so love sparkly things! Christmas and sparkly things are just like peanut butter and jam, peas and carrots, a horse and carriage....and all those other things that just go together! Cheers! - Marilyn D.
DeleteEl revestimiento de la pared te ha quedado fantástico Marilyn! Y esos estantes del gabinete encajan perfectamente,los tiradores son tan divertidos! me encanta tu proyecto!
ReplyDeleteBesos.
Muchas gracias, Pilar. Me estoy divirtiendo con eso, pero es muy agradable cuando un proyecto también trae alegría a los demás. Grandes abrazos. - Marilyn D.
DeleteI just love it when you hit the creative zone and everything just seems to fall into place! That is certainly the case with the amazing improvements you've made to the building this week and also to the fabulous lighting fixtures! I love it! I hope the post office will keep talking to you because you make an excellent team!
ReplyDeleteThank you, Jodi. Thankfully everything did work out but I really do have to try that pre-planning method I've heard so much about. Maybe in another life.... Hugs! - Marilyn D.
DeleteEverything looks really great, Marilyn! You did a great job on the wainscoting, and your cabinet pulls are so very Christmassy (if that's an English word?), very festive!
ReplyDeleteWhat an amzing job you did for the fabulous lighting fixtures, theyare completely in style for this building.
I hope you will go on with this build, I so love seeing your progress.
Stay safe, take care.
Hug, Ilona
Thank you, Ilona. I really enjoyed making the light fixtures once I finally decided what I really wanted. I may use this style again in the future because they were fun and easy. Hopefully you will see them in place and lit up on next Tuesday's post! Until then, stay safe! Big hugs. - Marilyn D.
DeleteMe encanta todo lo que has hecho hasta ahora !!!
ReplyDeleteGracias Eloisa Me estoy divirtiendo haciéndolo. ¡Gracias por venir! - Marilyn D.
Delete