Saturday 1 October 2022

Just a quick catch up

 I haven't gotten a lot done in these last two weeks but thought I should drop in to let you all know where I'm at.  

First, when thinking about my birdcage room box - or my "forest retreat" as I prefer to call it, I always pictured it with a table off to one side with a mirror above it but wasn't sure what kind of mirror I wanted. So, I headed down to my craft room - yes, of course I dropped some bread crumbs so I could make my way back out again - and looked through my stash.  There I found a box of frames I had purchased from Michael's a few years ago.  They had a whole bin of these frame sets.  There are 4 frames in each little package - 2 small round ones, one small square one and one very decorative one.  They came in four different colours and the decorative frame was different in each of the four colours.  They were on sale for $1.25 a package.  I bought lots of packages!

So, I chose two different frames, followed the bread crumbs out of the room, and headed back upstairs to see which frame I liked better.  Whichever I choose will be painted anyway so the colour it is right now doesn't really matter.  First I tried this pretty green rectangular frame.


Although I really do like it, I took a look at my other choice.  It has an arched top to it and, of course, there are several arches in the bird cage itself so this seemed like a no-brainer for my mirror choice.


This will be painted before I cut the mirror out to insert.  

This choice made, I set it aside, installed my steps and started adding the "rocks" to the base of my little retreat.


From there, I turned my attention back to my fireplace and chimney.  I dirtied up the inside of the firebox and, after taking another look at the tiles I installed earlier, decided that the location of the mantel was going to be much too low.  So, I added four more rows of tile in a decorative pattern and installed the rocks over the whole thing.  Then I installed some logs and a set of flickering fireplace lights behind the logs.  Before putting it in place I used some hot glue to build up the area that will be the "flames".  In the next stage I will use some alcohol inks to colour the glue areas to look more like flame colour. Here is the fireplace with the expanded tile area and with the lights turned on.


In the upcoming two weeks I will be painting all of the rocks - first with an all-over coat of a light colour, then adding a few other colours to bring out the rock look.  Then I will attach it to the cage and add the mantle piece.  I hope I will also have time to make a light fixture I have in mind and perhaps a few of the smaller, decorative items before my final couple of weeks will be spent on the "pièce de la résistance" for which I am hoping I can do justice.

I know this is not a lot of progress but I am hopeful I can do better before my next post.  Wish me luck!  Have fun mini-ing!  TTFN!! - Marilyn

Wednesday 14 September 2022

Rockin' my first idea...

 In my last post I left off with pictures of the beginning of the floor for my bird cage project.  I continued laying the floor in the pattern I had decided on, then left it for a couple of days to make sure it was well dried.  Once I was sure it was ready, I sprayed a few coats of sealer on the bricks to make sure they wouldn’t ‘dissolve’ during the grouting process.  Then I used ordinary drywall spackle to grout, waited for just a few minutes then used barely damp paper towel to wipe off the excess spackle before it set on the bricks.  I put a piece of waxed paper on top and weighted the floor down with a set of heavy books overnight to make sure it didn’t warp while it dried.  The next morning, I used a brush and liquid polyurethane to put a final coat on and let that dry for the day, then weighted it down overnight again.

I’m happy with how it turned out. 


Now, after I re-introduced my birdcage project in my last post, I hinted in my response to Sherrill’s comment that I had a couple of surprise ideas for the project that I would be revealing after I figured out if they would work or not. To be perfectly honest with you, I wasn’t really sure what the surprises would be but knew I’d figure something out. 

The first one had to do with the arched opening at the back of the room.  I had a few of ideas but wasn’t sure which way I was going to go with it.  At first, I thought I could install an arched mirror to reflect a tabletop display in front of it.  Then I thought, instead of a mirror I should install an ornate piece of metalwork to fit the opening.  That one held some promise for a little bit then I thought about a nice stained-glass window.  Yes – that would be lovely!  And with that, I went to bed for the night.  Of course, as always happens, I kept thinking about it as I lay in bed and came up with a fourth and final option – my little hideaway absolutely had to have a fireplace!  Winner, winner, chicken dinner!!! 

The next day I started the build on the fireplace.  The first thing I did was to make a form for the actual firebox, leaving an open space at the bottom which will eventually hold the battery pack for the flickering fire.


Then I began to lay the bricks to line the inside of the firebox.     


With that done, I built the form for the chimney and attached it to the firebox.  I tried it in place against the birdcage and was satisfied with the proportions.

I then took some rough-looking fibre packing material I had kept from an old purchase of some electronic equipment (real life) and ripped it into many small pieces to be used to “rock” the chimney and fireplace as well as the raised wall and steps leading into my little sanctuary.  I started by installing bricks around the top edge of the chimney then gluing the “rocks” in place.  These will later be painted, sealed, grouted, and sealed again.  (Yes, I was watching the Blue Jays ball game as I did this!)


As I moved down the chimney and was getting closer to the actual firebox, it occurred to me that I should have thought about a nice, tiled fireplace surround, to break up the stone look.  What could I use for tile??  Well, I did what I usually do when faced with such a question – I slept on it.  Sure enough, after only a short time lying in bed awake, it came to me!  My DD (dear daughter) Shauna has a new favourite hobby called “diamond painting”.  If you are not familiar with it, diamond painting is a fairly new craft hobby that's a mix between paint by numbers and cross stitch. With diamond painting, you apply thousands of tiny resin "diamonds" to a coded adhesive canvas to create shimmering diamond art images.  My DD has lots and lots of these tiny little resin pieces in all sorts of colours.  They are basically available in the same colours as you could find in DMC floss so, the next morning, I called her and asked if I could “steal” some from her.  She brought her supply over and we picked out colours that would match well with the fabric I chose for the cushions for the chair and footstool.  I used colour number 3756 for the white, 3841 for the light blue and 930 for the dark blue.  The following pictures show the progression as I installed all these tiny “tiles”.  I think the size was perfect and I really like how it turned out.


Here is the fabric I used for the cushions. 


I’ve temporarily set the fireplace in its spot so you can see the chair and footstool against the tiled fireplace surround.  Not a bad match, I think. 

With that done, I turned my attention back to installing the rocks.  It is certainly a tedious job but, I think it will be well worth it in the end. (Fingers crossed!)  I can only go so far with the rocks on the chimney because I am waiting for the working fireplace lights I ordered recently.  When I have done as much as I can here, I will then start installing the rocks around the raised base of my birdcage room.  

So that's as much as I have to show you this week.  I will post again in two weeks time and will hopefully have made a lot more progress to report.  I hope you enjoy the pictures of what I have done so far.  Until the next time, enjoy the good weather we have left and keep on mini-ing! TTFN!!

 - Marilyn

Wednesday 31 August 2022

Everyone needs a 'hideaway'.

Last month, after finishing the horse stable book-nook for my sister-in-law, I turned my thoughts to my next project.   What should I work on?  Should it be one of my unfinished projects?  One of the hundreds of ideas I have floating around in this busy brain of mine?  Should I search for new inspiration?

In the end, I decided to get to work on a project that actually incorporates all three of these.  Some of you may remember that a few years ago, I had posted a picture of a small project that I found really inspired me.  I decided on a container for the project and took a few small steps to get started.  Since making that very basic start, I set it aside and moved on to other projects.  However, since it actually incorporates the concept of an unfinished project, one that I found when searching for inspiration, and one that incorporates new ideas I have had floating in my mind for the last few years, it’s perfect!

A quick review to remind you of the project from a few years ago begins with the picture which inspired me.  I know many of you have seen this lovely piece online and I am sure admire it as much as I do. It is so beautiful in its simplicity.  Louise did a search for me and, on Pinterest, believes she found the name of the miniaturist behind this wonderful little project: Natalia Volchkova.  If this is not the right person, please let me know as I am a firm believer if giving credit where credit is due! 

I know you’ve also seen the picture below before, when I first thought about doing a project inspired by the above picture.  This is an old, ratty, dirty bird cage I used to use years ago in my outdoor garden decorating.  It has sat in the garage for years, gathering dust and grime.  The wicker in the bottom edge of the cage and dried and broken and was also looking very sad.  So, I removed the wicker, took a metal brush to it to clean off the dirt and dust, and took another look at it from every angle.  Having removed the original arched door to the cage I then decided the opening would look better at the back of the project and Bruce removed several of the vertical bars from what had been the back of the cage, making it the new front with a nice wide opening.


 I removed the ugly clasps that held the top to the bottom of the cage and painted it a very pale blue.  I really love the softness of this colour.  It works perfectly for the scene I have in my head.


I decided I would raise the floor so I can hide a battery pack underneath and that I would have a brick floor inside and would fill in the space where the ugly wicker used to be with a stone look finish.  Here I have cut a piece of mat board to fit the inside and have started to dry fit the bricks.  Then I drew some straight lines across the floor to make sure I could stay in line as I went and I started to glue them down.  When all the bricks were laid they were sprayed with a sealer and left to dry before I applied grout to them.  I will show you the finished floor in my next post.


In the meantime, I had decided I would make a wicker chair and footstool for inside this little “hideaway”.  Well, I actually thought I would make a wicker chaise longue but Marijke, Louise, and even my DD, Shauna, said a chair and footstool would be better so I reluctantly gave in happily changed direction.  Here is how they look before I made the cushions for them.


So now I am off to grout the floor and begin the tedious job of making “stones” for the outside.  In the next post I hope to be much further along!  Until then, big hugs to all of you out there.  I so enjoy reading about the wonderful things you have been doing in your own blogs.  Minis go deo!! (Minis forever in Irish *smile*) TTFN!!! - Marilyn

Monday 18 July 2022

Book smarts and horse sense...

 ...I certainly needed a little of each of these to tackle my most recent project.  My last few projects included the Hearth and Home market stall which I gave to my daughter.  Before that, I had completed The Knit Wit – a yarn and knitting store for my SIL, Jean’s birthday.  She is a very talented and creative knitter and crafter.  The building itself was a mirror image of the Quilty Pleasures fabric and quilting store for I made for the birthday of my equally talented, quilter sister, Joan. 

After finishing and handing over the Hearth and Home market stall on June 27th, I realized my SIL Marlene (Bruce’s sister) was approaching an important milestone of her own – her 70th birthday – on July 11th.  Did I have enough time to make something special and personal for her?  If yes, what should it be?  Two of Marlene’s favourite things are her weekly horse-riding sessions at a local equestrian centre and reading anything she can get her hands on.  Books have always been an important part of her life. 

So, should I try to make her a library or a bookstore?  How about a horse barn?  Hmmm – picturing these in my mind made me think that both concepts could end up quite large and, as she has limited space in her home, perhaps not practical.  Also – there was the other big factor – I had less than two weeks to make whatever I decided on!  Then, lying in bed in the middle of the night (when all my best ideas come to me), I landed on a solution:  combine both ideas in a footprint small enough to fit with her living circumstances.  A bookshelf insert was the answer!

Now, you have to realize that I had never made one of these before, but the concept intrigued me and we all know I like to challenge myself at least a little bit, so I took a day to look through examples of book nooks and bookshelf inserts and started to formulate things in my mind.  Then I did something I think we all know I NEVER do – I created a plan on paper to guide me!  What a novel idea!!  Then I got to work. 

I started the actual build on Wednesday, June 29th.  I know – crazy, right?  I decided I would make the main body using just foam core.  Having decided on the height I then added the measurements of both sides and the back together and added half an inch to make up for the overlap of the sides to the back and drew and cut out a single large rectangle from the foam board.  I cut ¼” grooves into the foam board, carful to leave the bottom layer of paper intact, so I could then fold the rectangle into three walls without exposing any bare foam on the sides. 

I cut out a floor to fit between the two walls then started drawing out the plan for the interior horse stalls directly on the floor. Since I knew I wanted to add an angled mirror at the back to make it look like the stables continued around a corner, I planned space to hide a little bench and shelf unit in the corner that would only be seen through the mirror.

I then drew lines on the walls to mark a ¼” space at the bottom to allow for the thickness of the floor, another ¼” space to mark the top of the walls, leaving space above for the wires for the lighting and the battery pack, and drew in the double barn doors that would lead to the pasture.  I cut out the window sections in the barn doors.  

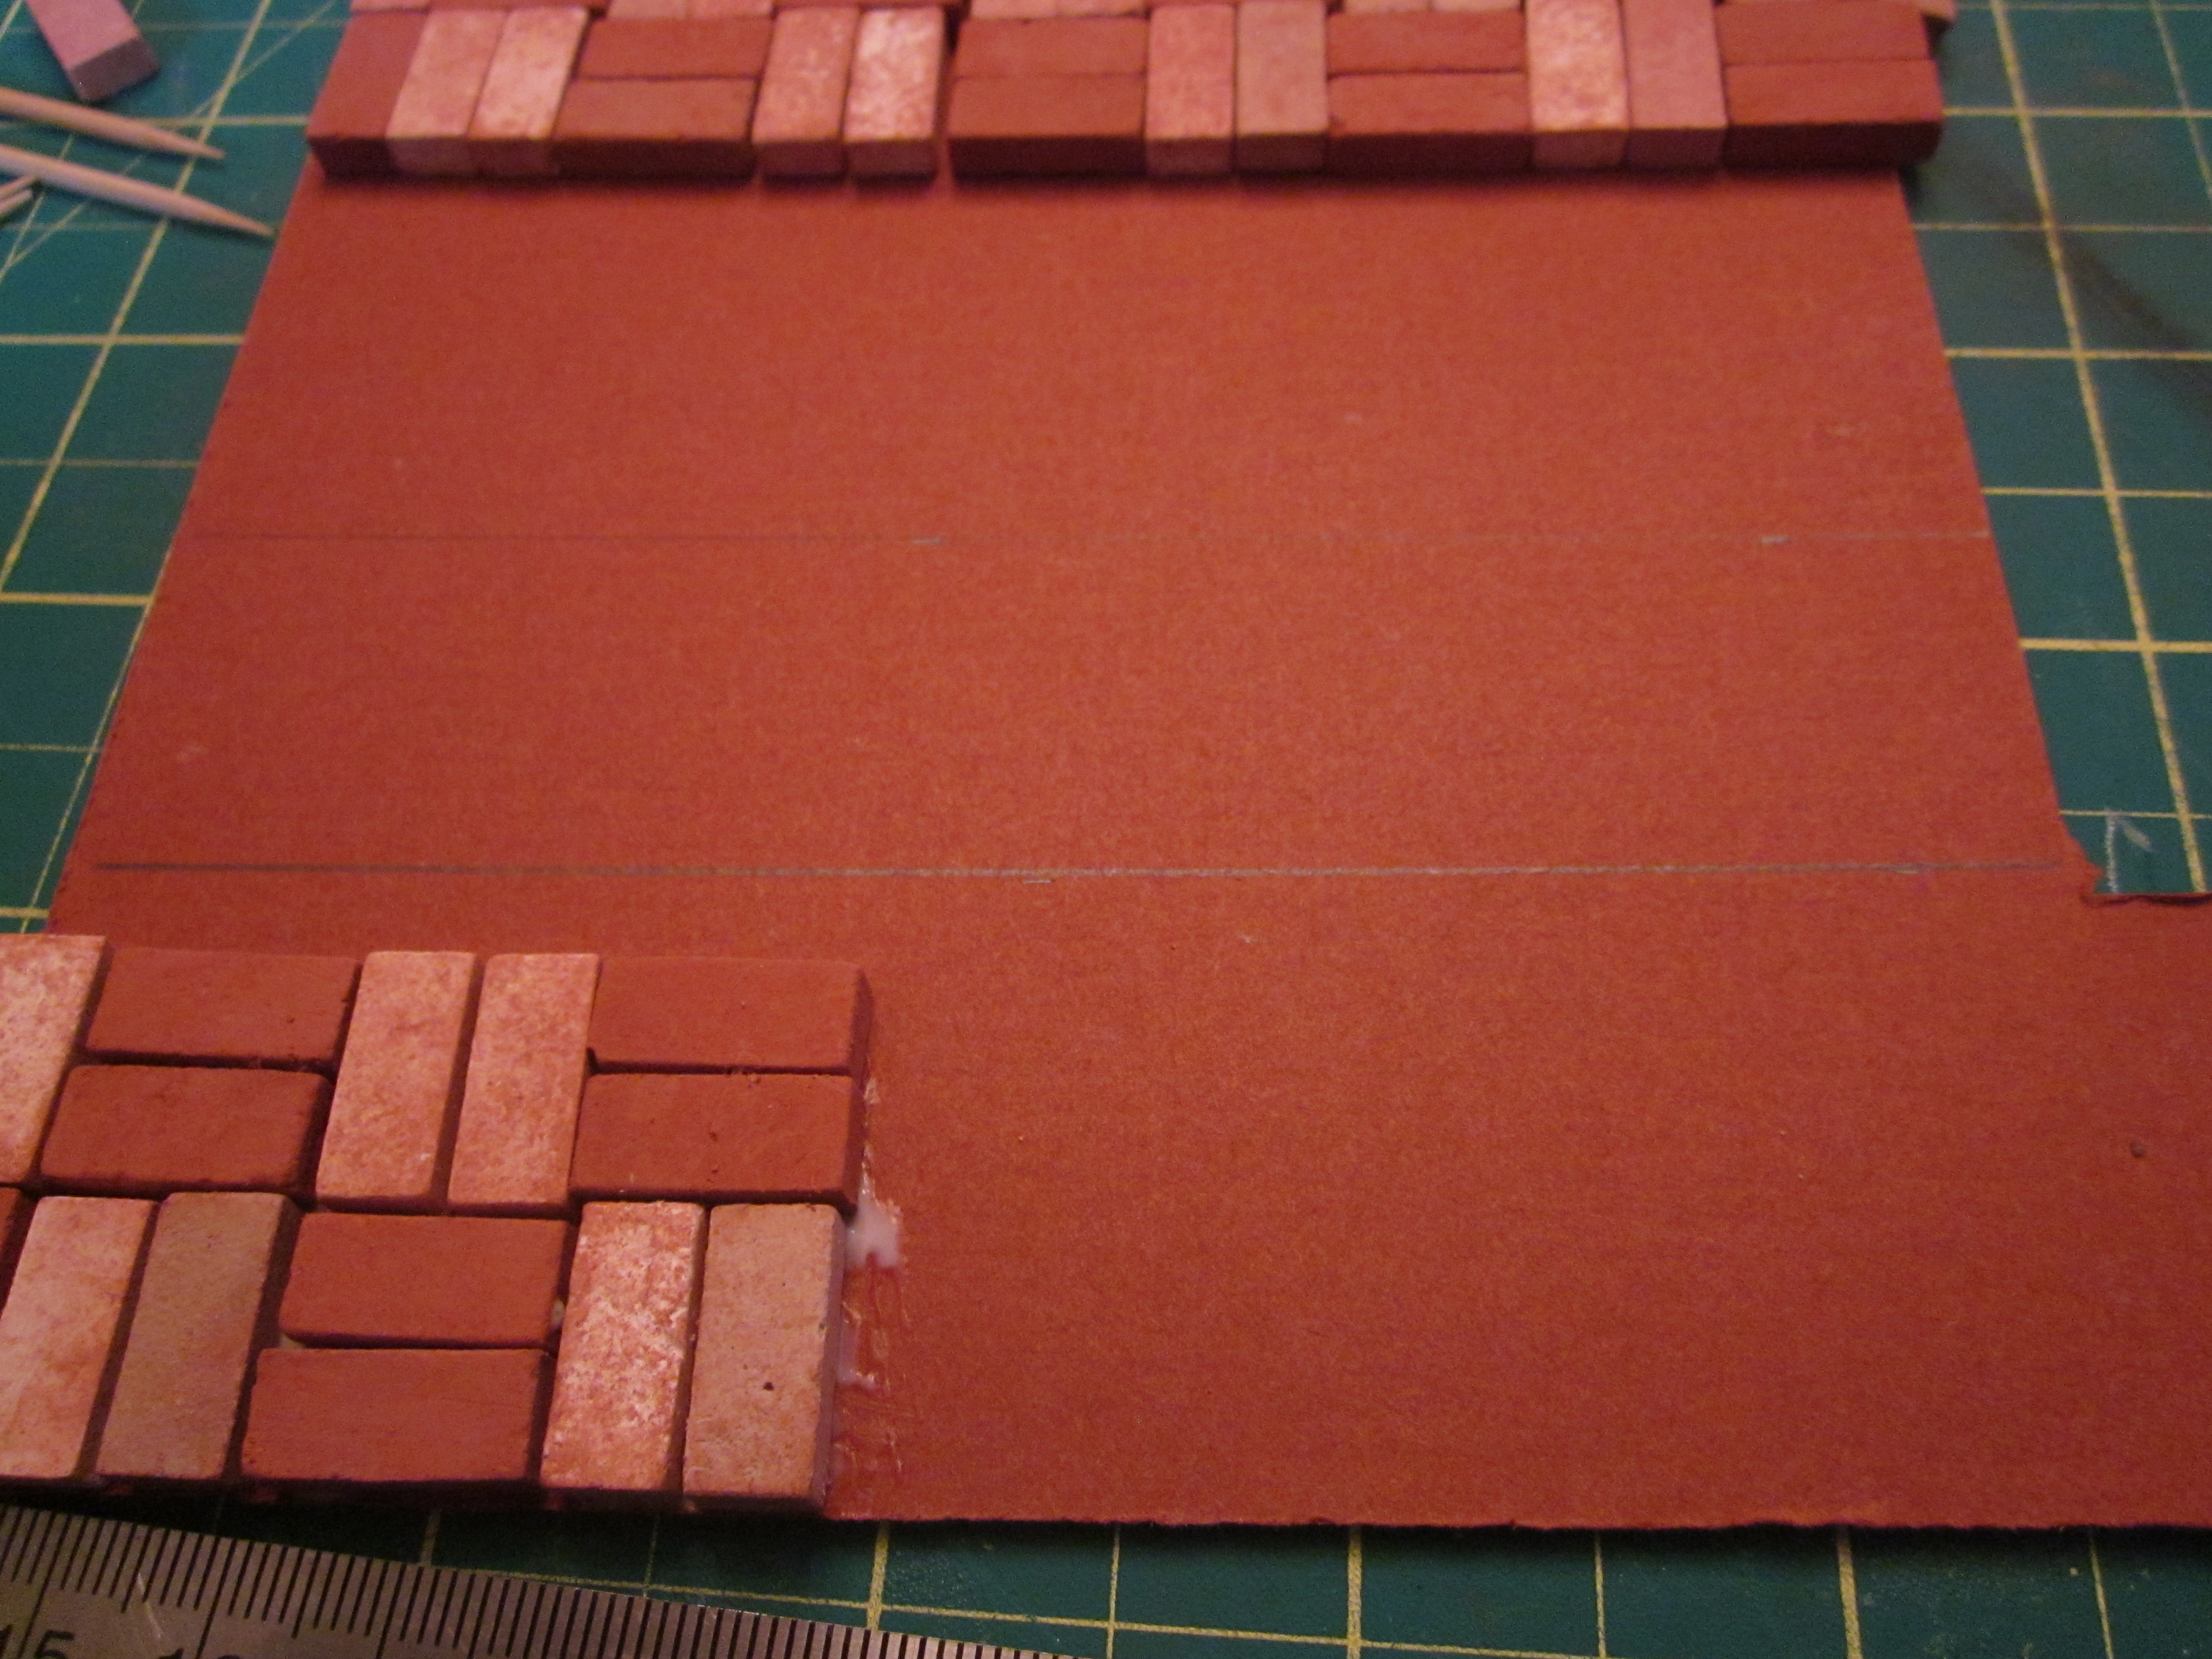
I painted the insides black, then started cutting the wood I had stained for the walls and glued them into place.


I trolled the web for pictures of horses grazing in a field and chose one to put behind the barn doors to look like horses off in the distance.  The plan was to include lights above and behind the doors to look like sunshine streaming into the stable block from the outside.


I built the stable walls using the same wood glued to strips of black Bristol Board cut to the sizes I had calculated in my planning phase.  Okay – you got me!!  I’m lying!!  I just figured each wall out as I went, then cut and glued.  (insert shameface here..)  I so wanted you to believe I had reformed my “fly by the seat of my pants” technique but, alas, some habits die hard!  Anyway – it all worked out in the end.  *smile* 


Of course, it is no use having stables if you don’t have horses so now I was on a hunt for horses that would work in a 1/24th scale build.  That was much more difficult than I thought.  After searching through online sites for Amazon, WalMart, Michael’s and Etsy and dropping into our local Dollarama, I thought I was going to be out of luck and out of horses.  However, then I went back online and searched Toys ‘r’ Us, and there they were!  Perfect!!  I ran to the local store and picked up two.  Of course, to make them fit in such a narrow space, I had to cut their butts off.  Poor horsies!  Now I have two horses’ a*&es left over!  Hmmm – don’t see a need for them in the future.  That’s too bad.  Anyway, I cut the two horses using two different angles so that they would not be looking in the exact same direction when placed in their stalls.  I think they worked out well.


When the stalls were in place, I installed the mirror on an angle and began looking at accessories.  I built the little bench that would be hidden in the corner and seen in the mirror and found a 1/24th scale pair of cowboy boots to place under the bench.  I also used some air-dry clay to make 3 small riding helmets and hung them on the wall beside the bench but, unfortunately you can’t see them in my pictures because they are hidden in the shadows beside the mirror. 


I placed a few small books (about horse care, one can assume) on the shelf along with a few containers holding miscellaneous goods.  I wanted to hang halters and reins from a small shelf above the bench.  I really had no idea what they even looked like so, after studying several pictures online, and making a drawing to follow, it took me 2 hours to make 2 tiny sets of halters!  And then you can barely see them way back there!  


The two sets of reins were so easy, I ended up making a third to hang from the cabinet at the front of the stables.  I used cloth-covered floral wire (2 pieces of green, 1 of brown), wrapped each around a skewer a few times, leaving two ends hanging down, which I then threaded through the eyes of eyelet bead pins.  I bent the floral wire back, then clipped the bead pins, leaving a vertical piece to bend backwards to look like the clips you would find at the end of the reins.  I know – that’s a long explanation for something that took seconds to make.  That’s to make up for the short explanation for the halters which took so long to make!

For the rest of the interior accessories:  in the little cabinet at the front, we have a box of vitamins, some rags, a box of horse treats and some leg wraps - and also the 3rd set of reins I made hanging from a hook.


On the bench below we have a small wooden tote which is holding a hoof pick, a stiff brush and a finishing brush while a rubber curry comb sits on a cloth hanging over the edge of the bench.  


To the right of the barn doors there is a broom and a rake hanging on the wall.  One of our horses is looking longingly at the basket of carrots and apples that is sitting on top of a bale of hay.  A large bucket sits outside a stall and contains a shovel and a hay fork, waiting to be used during the next “mucking out” of the stalls. 


I used flat tape-wire lights that I got from Dollarama for the ceiling lights and the lights coming in through the barn doors.  I poked two holes in the ceiling near the front of the box so I could glue on an on/off switch hidden on the underside of the ceiling and fed the wires through the holes to the top of the roof.  I cut the lights from the battery pack so I could splice the on/off button onto the battery pack.  This allows the battery pack to be turned to the “on” position permanently, and for the lights to be turned on and off using the hidden switch, rather than having to lift off the roof to reach the battery pack every time you wanted to turn the lights on or off.  I cut the light tape into lengths to match where I needed them in the barn (6 lights per length as it turned out), and a short length of 3 lights for outside the barn doors.  Then I spliced and soldered mini electrical wire to one end of the first strip and poked holes in the ceiling so the wires would go through and be spliced to the other end of the on/off switch wires hidden above the ceiling.  I glued the strip of lights to the centre of a piece of white Bristol Board which was three times as wide as the light strip.  I bent the sides of the Bristol Board down to look like a long white metal light holder, poked two more holes at the end of the strip and fed another short set of wires I had soldered at the other end up through the ceiling again.  I prepared the second strip of lights and soldered it to the wires leading from the back end of the first strip, feeding the wires through the ceiling in the same way.  Then I ran the wire across the top of the roof, over to where the barn doors are and down the outside wall to, once again, solder the short 3-light strip and install it over the window on the outside of the wall.  I tested the lights after each length was added and everything worked perfectly! 

Now with everything done within the horse barn, it was time for the second part of my plan: how to incorporate my SIL’s love of books into the project.  Simply put, I papered the outside of the box to look like a set of books, including using a paper on top that looked like book pages and adding thin pieces of wood, covered in matching paper, along the top to look like 4 different book covers.  I made two doors from foam core, which I actually attached using duct tap as hinging, before I papered the outside walls.  I made grooves in each of the doors to tuck the different paper into and continue the look of book covers.  I printed out the names of 4 well-known books onto clear labels and stuck them to the “book” fronts, then, in order to keep the doors closed when that is desired, I glued thin suede ribbon on the back and two sides, allowing it to be tied in front when needed.  This made it look like a stack of books tied together when the doors are closed.  It is much easier to understand when you look at the pictures.  A portion on the top is cut and has small finger holes in it so it can be lifted out to change the batteries whenever needed.


Whew – this is a long post to describe my first foray into making a bookshelf insert.  Bottom line – my sister-in-law loves it and is so pleased with how it combines her love of books and her love of horses.

Now I have to think about my next project.  I have a few things in mind but it may be a month or more before you hear from me again because we have a vacation coming up at the end of the week so it may be a bit before I can get started.  Until then, enjoy your summer, wherever you are.  

Hugs to all!  TTFN - Marilyn

P.S. - Just wanted to share my latest auction purchase with you.  Our local auction house was having an estate sale which included many pieces of Hummel figurines, which I really wasn't interested in until I noticed that one lot was for 2 Hummel figurines which were only 3/4" tall!  They are called "Micro Hummel" or "Micro Goebel" which I didn't know exist.  Perfect for putting into a mini scene. Score!!!