Sunday 8 November 2020

Time to reflect on what is important

While the malls and stores are all decorating for Christmas - and don't get me wrong, I LOVE to decorate for Christmas, my husband and I just completed a small tribute to what matters more to all of us. It doesn't take much - a package of red plastic plates and a roll of black shelf liner and some left over red mesh from our Christmas decorations. This little bit of labour was fueled by a whole lot of love, admiration and appreciation. Thank you all who serve.
In memory of my late father:
MWO C. Vernon Gay
Army
WW II; Egypt; DND Headquarters

and my late father-in-law:
Cpl. C. Stewart Driscoll
Army
WW II, Korea, Cyprus

and in appreciation of my son-in-law
Sgt. Kevin R. Dean (retired)
Army
Golan Heights; Cyprus; Bosnia; Afghanistan

May we all take a moment this week, and particularly on Wednesday, to honour those who have served, and continue to serve, to keep us safe and free.  May their sacrifices never be forgotten.

Wednesday 16 September 2020

Life is getting back to normal

...or as normal as can be expected given this strange time we are living through right now. I am happy to say that my better half has been back home now for closing in on 4 weeks and is getting stronger every day. I am so very grateful to have this period behind us but am now concentrating on getting some weight back on him - not that he was very big to begin with! I keep telling him I will gladly donate any extra pounds he needs since I have many to spare but he's not buying it! He spoke to one of his cardiologists this afternoon who has cleared him to get back to his regular routine so we're both very happy!

Today, for the first time in weeks, I spent the afternoon working on minis with my friend Louise via Skype. It's really great to be starting back down that road again. So - I'll keep this post short and just let you know that all is good here and I should actually have time to get something accomplished on my North Pole Post Office this week so I can get back to regular posting this coming Tuesday.

Thanks to all you wonderful people out there for keeping my spirits up during a very scary time. Big, big hugs for all of you! TTFN! - Marilyn

Tuesday 11 August 2020

Be back soon!

Sorry everyone - I know this is Tuesday but I am in the middle of a family medical emergency so have been unable to work on my minis this past week. This next week is not looking good either so I will probably not have anything for the upcoming Tuesday either. However - I sincerely hope all will be resolved and I will have an update for you on Tuesday, August 25th. Until then - keep on mini-ing and posting so I can live vicariously through you! Thanks everyone.

In the words of Arnold Schwarzenegger - "I'll be bawk!" Big hugs to all. TTFN!!! - Marilyn D.

Tuesday 4 August 2020

Slow and steady

Once again, real life has left me with not as much progress as I would have liked but I'm plodding along - happy to just get something done. I did get some necessary, although boring, tasks completed: I finished putting baseboards in all of the rooms, I added a base surround to give me some room to add piles of snow around the edge of the building, and I built a frame for building the loading dock doors.


I'm planning on an old-style door with a strip of 3 windows above and a door that looks like 3 doors side-by-side but is actually a double size door plus a single width door. Hopefully it will look like what I have in my head.

I finished the door handles for the front and middle doors. I used white beads for the end of the handles for the red door and red beads for the ones for the white door.


Then I installed them, of course.


I also put together the little lunch room corner so our postal elves will have someplace to take a break and have their lunch, or a snack. Of course they have the essentials there - regular and barbeque-flavoured Pringles and a tin of chocolates! I see someone is about to have their sandwich. I hope they're working in the back room for the rest of the day - looking at all those onions they're about to eat!


The Camp Mini Ha Ha coffee cup was a little something provided to Campers by a generous "secret Camper". I purchased the sandwich plate some time ago.


Last week I received this chair kit from my friend, Marijke and thought it would be perfect for this scene. The chair kits were made by Samm Brockhurst, from Ontario, to go along with the 2008 wall-hanging kitchen project from Camp. Marijke had a few of the extra kits and gifted one each to Louise and I. It did take me a little to figure out how to put it together but, once I realized the 4 pieces I was wondering about were for forming the "apron" around the seat of the chair, things went much more smoothly. I did have to cut the back legs a bit as they were longer than the front legs.


The shelf unit I made last week now contains dishes, a tea kettle and coffee pot, the aforementioned Pringles, and a lovely little radio that was a Camp tidbit a few years ago from Sherry Parker from Nova Scotia. I'm not sure about the white spots showing on the walls in these photos. I thought they might be excess glue and I would touch up the wall paint to eliminate them but, when I checked, there was nothing there. Perhaps just a trick of the light?


So - that is all that was accomplished this week. I do want to leave you with a new link, though. All of our Camp Mini Ha Ha people were so disappointed that this year's Camp had to be cancelled so we decided it was time to start documenting the projects from prior years. We have put out a call for Campers to send in their own bios and pictures of finished projects over the years. The blog is set up so that, once fully populated, if you want to see all of the various interpretations of the same project, you just click on that year in the label section. Alternatively, to see all projects of one particular Camper, you choose their name from the labels. We're in the early days of posting but, over time, a complete picture of our Camp adventures should be available. To see what we have at this point, visit the blog at: Camp Mini Ha Ha Projects.

UNtil next Tuesday - keep safe and keep mini-ing!! TTFN!! - Marilyn D.

Tuesday 28 July 2020

The tortoise and the hare...

Okay - there is no hare - just a tortoise and that's me!!! Once again I got very little done this week but I will show you the very little bit that I did do.

I did cut the last side wall in half so I could permanently attach the wall for the front, customer service end of the building. I then built a wooden wall for the back portion so I could attach a 1 inch strip of wood the the MDF back wall and still be able to hinge the rest of the wall (I knew screwing hinges into MDF would not work in the long run, hence the wood). I painted the portion of the wall that will be in the bathroom area and wallpapered the portion in the work area.

So - what else?? Hmmm.... Well, I did start making toilet paper for the shelves in the bathroom:


Then, of course, I knew I would need labels for the packages of toilet paper so, rather than waste a whole sheet of clear label plastic, I put some time in lining up a variety of labels for cleaning products, paper towel and toilet paper. Now I just have to make the little shapes to stick the labels on. I figure I now have enough labels to last me until my miniature-making days are over!!


I also had an idea for a set of shelves I wanted for over the table in the work area/lunch room area. I used 3/16" x 3/4" wood for the shelves and some very small strip wood for the sides. I still have to paint it white, in keeping with everything else, although I quite like it in the plain wood, I must admit.


So - that's all I managed to get done this week. Oh - I also had a broken wire in one of my wiring set ups so had to replace the light.

Here is the hinged wall (not yet applied to the building) the table for the lunch room area with the 3" wide set of shelves on top, one package of toilet paper I made up and ... oh yeah, I also made four long, candy cane striped door handles - two for the front door (inside and out) and two for the door leading into the back room. I will make the brackets to hold them and get them glued on to the doors this week.


I do hope I have more progress to show you next week as I know how boring these short little posts must be. However - I do want to leave you with one little thing: I finally managed to convince my good friend, Louise, that she needed to start a blog so she could show some of her amazing projects and hand made furniture. You can find her at Flaminis (https://miniflamobsession.blogspot.com/) She asks for us to be gentle with her as she's just beginning to explore the world of blogging but then - what else would we be?? We all love a new blogger!

Until next Tuesday - big hugs to everybody! TTFN!! - Marilyn D.

Tuesday 21 July 2020

Last Call

This is a very short post this week as I have been busy with a lot of rel-life things - mostly working on database entries for the Irish Association as we are in the middle of developing a new web site. As a result - I have not had much time for minis this week *insert large sad face here!*

Since I wasn't able to work on the North Pole Post Office this week, I thought I would post some pictures of the hydrangea tree from Dorothy's Corner. YES!! I have actually finished it and "planted" it in place.

Here is a picture of a real Pink Diamond hydrangea:


Here is my final version in place:


Suffice to say - I am so glad I had only 29 branches and buds to apply florets and leaves to instead of the number of branches on a real tree! I couldn't possibly live long enough to complete that!

I planted the tree behind the fence so that it can hang over the garden on the other side. Also, the pink of the flower heads is almost exactly the same colour as the pink of the bird house on the wall above it.


If you look closely enough you can see the little blue tit perched on the top rail of the fence, under the tree. Also, Dorothy has been a little remiss in her gardening as she has missed a few dandelions growing at the base of the tree. I guess it's a matter of "out of sight, out of mind". I can understand that!


Sorry for the brevity of this week's post but the good news is - you won't have to see any more entries about Dorothy's Corner!! I do hope I will have some time to spend on the Post Office this week coming up so I can share some updated pictures of its progress next Tuesday. Until then, I hope you all have a great week working on your own minis and are keeping safe and healthy.. Big hugs! TTFN!!! - Marilyn D.

Tuesday 14 July 2020

A Cautionary Tale

... That's basically what I call my whole journey into miniatures...a cautionary tale for everyone out there who would like to know the proper way to do things. Following my example would not be the way to go!!

I know, and have always known, that planning in advance is so important and can save so much time and anguish on your project. However, that is just not the way I roll! As a result - I once more find myself at a crossroads where I have to take a step backwards in order to move forward.

My original intent was to have the walls of the North Pole Postal Service permanently in place with a clear dome for the top so the interior can be viewed from above. However, every time I set the last wall up against the building, I felt like it would be difficult to view a lot of the planned (yes - I did say "planned") details. After much agonizing, I decided I needed to have that last wall hinge open in some way. Well, the building is made from 1/4" MDF and we all know that screwing hinges into MDF does not often have good results. If you are going to install hinges, you really are better off screwing them into wood. So - I could do that by using wood glue to attach a one-inch strip of solid wood to the existing back wall and the floor in that area. Then I would also need a piece of the connecting wall to be wood as well in order to secure the hinges. Well, as we all know by now - I have that 22" long wall already finished with wainscoting for the front room portion, wallpaper in the back room area and a painted wall in the bathroom area, not to mention that the light sconces are already attached and wired onto the wall in the front portion.


Now what to do??? I haven't had a lot of time to work of minis this week as real life has gotten in the way - which is why I am posting late on this Tuesday, but I have spent a lot of time thinking about that darn wall.

In the meantime, I have taken advantage of the few pockets of time I have had to get just a couple of little things done. I used my Cricut maker to cut out the letters and images for the signs for the building. Here is a picture of the sheet of cardstock before I finished punching out all of the negative spaces.


Then, I glued and stacked three of each letter and sleigh image to provide a thicker profile. I arranged them on white Bristol board until I was happy with the spacing, glued this onto a 1/16" thick piece of sheet wood and framed all of it with a red trim piece of basswood. I have installed the sign on one of the side walls and, as soon as I finish the other wall, there will be a sign there as well. I will have to cut that one to match wherever I cut the wall to allow it to hinge open.


I also managed to finish making the electric meter to hide the wires and battery for the front room and bathroom lights. I first painted it with a couple of shades of grey, dry brushed with silver and again with white to make it look more like galvanized metal. I didn't like it at all so I repainted with a light grey, leaving just a bit of the old paint job showing. Then I hid the wires in the two upright pipes and the battery and on/off switch in the main box. I cut a hole in the side for the switch to be accessible, and I wedged a piece of wood inside to make sure the switch didn't get pushed back into the meter box. It's all glued in place and the wires are now hidden. Whew - finally, one problem solved!


As for my dilemma with the wall?? Well, Bruce cut a partial wall for me from 1/4" plywood, cut that into a 1" wide piece to attach to the back wall and drilled holes in the two pieces to accommodate the hinges.


Now I will have to test fit to determine where to cut the original wall to meet up with this new piece, and start painting and wallpapering all over again. Wish me luck!!


Tuesday 7 July 2020

Channeling Bob Ross

Do any of you remember Bob Ross, the gentle, soft-spoken artist who taught painting on a PBS television show called The Joy of Painting? I used to watch him regularly. He always fascinated me with how simple he made everything seem and, in no time at all, ended up at the end of each 30 minute show with a completed painting. One thing he used to say frequently was that there were no mistakes in painting - just happy little accidents.

Well, today's short post is about my latest "happy little accident".

Moving along with the North Pole Postal Service, I wanted to get started on the outside wall finish so I could permanently attach the lanterns outside the front door. Since I had already run the wiring, the lights were hanging loose until I could get the wall finished behind them. I wanted the post office to look like it was made from large blocks of snow and ice so I proceeded to cut lots and lots of 1"x2" rectangles of thin white foam from a pack of styrofoam plates I got at Dollarama. I figured that once I was done I could then use a combination of paint and fine white glitter to make them look more realistic. Before I started gluing on the foam pieces, I painted the walls white in case any of the wall ended up showing through the cracks between blocks.

I started gluing the blocks on the walls using my go-to glue: Quick Grip. After I had a few rows done, I looked back and was horrified to see that the glue was melting the foam pieces! I should have known that was going to happen! So, then I was left with a dilemma. Should I try to rip them all off before I got too far along and the glue was truly dry? Or, should I continue and try to fix things later. You know me - I decided to carry on and see what I could do to repair things later. The "happy little accident" showed up when I had completed a large portion of the first wall. I thought it looked like actual ice blocks!!


I continued along, finishing off that wall, the back wall and the front wall. I was liking it better all the time. And, yes, once the blocks were applied, I then permanently installed the lanterns by the front door.


Here's a little closer look:


So, now I have three walls done and am looking down the length of the side wall. What I am left with is the wires and battery back for the interior lights that I will need to find some way to hide while still having access to change the battery.


So - how will I hide these? Well, I took a look at the electric meter box at the back of our own house (and yes, when taking the picture I realized it was time to get a can of spray paint and refresh this too!). It looked like something that could work.


That's just a downspout to the left of it so I didn't need to be concerned with that. I took measurements of the box, gathered some bristol board (poster board?) and a paper straw and started to see what I could do.


So far, so good. I will make a top for it that will hinge, paint it up and show you the results on next Tuesday's post. Please keep your fingers crossed for me because, to be honest, the battery holder just BARELY fits into this little box. Also, I need to find something to use for the clear glass dome in front where the numbers from the electric meter can be read. Hmm - I do have an idea there - I will let you know if it works. I'm off now to see if Netflix still carries Joy of Painting shows. I think I need a little of the soothing voice of Bob Ross. Until next week, keep safe! TTFN!! - Marilyn D.

Tuesday 30 June 2020

Lighting the way

In my last post I showed the light sconces I had made for the customer service side of the North Pole Postal Service. After painting them white, so they would "pop" against the red walls, I went looking for something to use as "glass" inside the sconces. Since I didn't want the "glass" to be completely clear, I had a number of options running through my head. I thought that perhaps I could use clear acetate then line that with either parchment paper or waxed paper to provide an opaque look. So, I went to my stash to first find the clear acetate. Yes, I had lots of small pieces but....look what I found:


Isn't that perfect??!!?? I always knew there was a perfectly good reason for buying cookies in the bakery section of the grocery store. Sure - that's why I but them - for the mini supplies!

So - most of the rest of this post is to discuss how I hooked up my lights - for the benefit of anyone out there who is new to the hobby and would like to learn how to do it themselves. For those of you who have been doing this for a while, hang in there - there will be some eye candy at the end of the post!

So, I now had my sconces and the faceted acetate to line them with. I gathered all the supplies I needed to bring on the light. I had already planned (yes, I know that's not a concept you hear from me very often) where the lights in the front room were going to go. I drilled small holes from the inside of the walls to the outside to feed the wires through, and I used my Dremel tool to create channels from the holes down to the bottom of the wall so I could run the wire down the channels.

I purchased several LED nano chip lights from Shelley at Freedom Miniatures for the sconces.


These lights are very tiny, although they provide a good amount of light. What I really like is that several can be connected to a single 3V button battery/switch. Here you can see the light (the tiny yellow dot at the end of the wire I am holding) and the battery that will be used to power them.


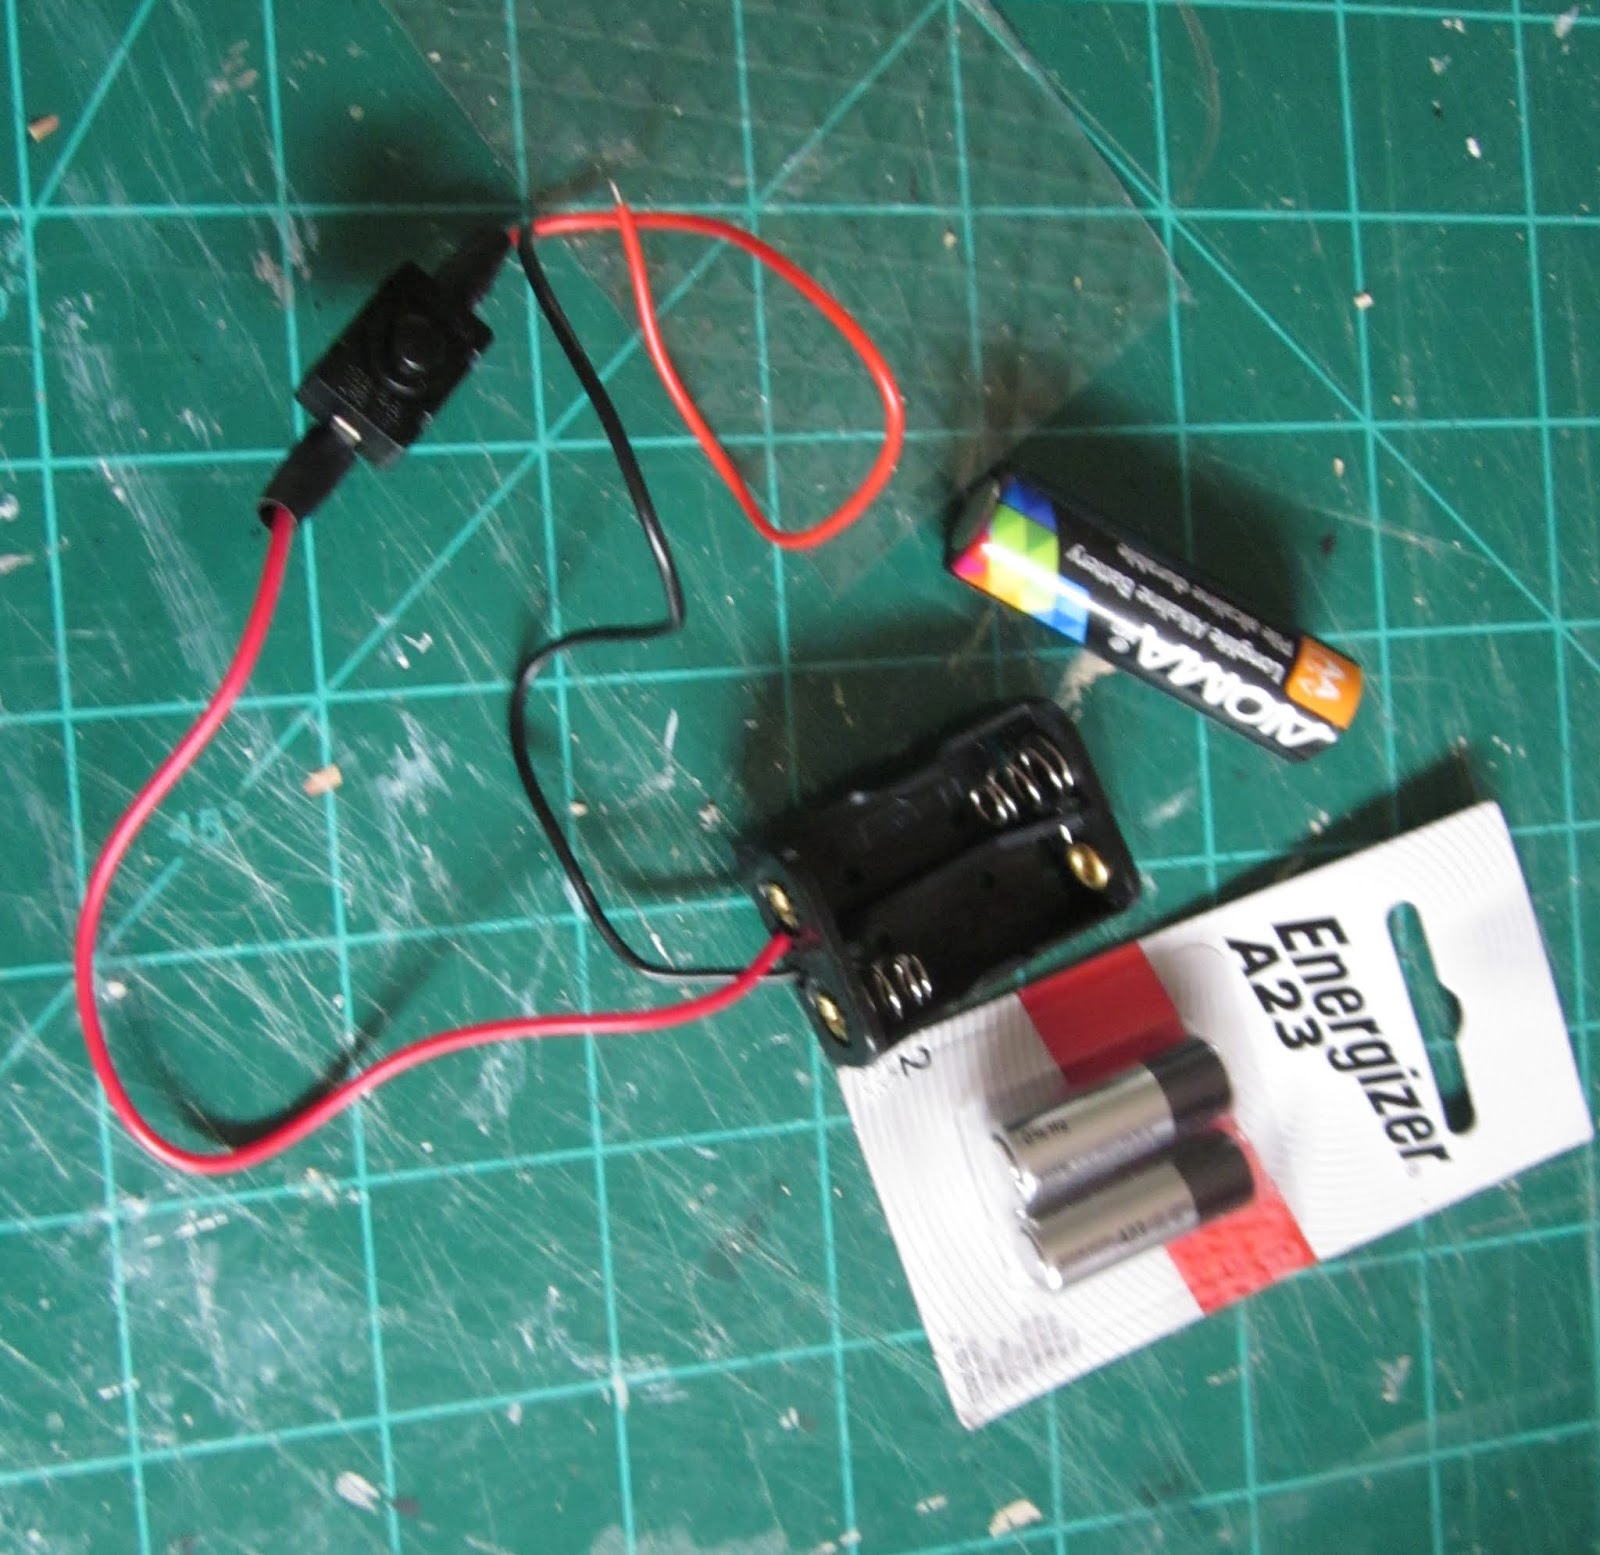
To hook things up I was also going to need some additional wire, some heat shrink tubing, and a Sharpie marker. Yup, a Sharpie - you'll see. I know I have a coil of dollhouse wire somewhere and it will show up when I least expect it but, for now, I used what I could find - a package of dollhouse "extension cords".


Again - for any beginners out there - to remove the "plug" end of this wiring, all you have to do is pull out the 2 brass pins. The way the plug works is that the wire is fed up through the centre hole of the plug, separated and the ends stripped a little bit to expose the wire for a connection, then bent back on itself with one side each being fed back into the holes on either side of the centre hole. When those two brass pins are shoved into the side holes it allows an electrical connection to form once connected to a battery or power source.


I mentioned that I had drilled holes (Okay - I asked my DH, Bruce, to drill the holes) to feed the wire through from the nano chip lights. These lights are so tiny that they could easily pull right through the little holes drilled so the first thing I did was to feed the wires through a tiny clear seed bead. The bead was just big enough that it wouldn't go through the hole and small enough that the nano light wouldn't pull through it. Then I fed the wiring through the hole to the outside of the wall. In the following picture I have the building on its side and you can see the wires from one of the lights sticking out at the bottom of the channel I made for it. Although it is hard to see, if you look closely you will see that there are two wires for every light - a red wire and a black wire. The red wire is the positive wire and the black wire is the negative wire. This is very important!


The battery pack also has red and black wires so that makes it really simple, right?? Not necessarily! In my case, I needed to add length to the wire, hence the white wire from the extension pieces. There is no "positive" or "negative" to this wire until you hook it up, then it is important to identify it, hence the Sharpie!

Once I removed the plug end, I used my jewellery wire cutters to cut the additional length of wire I was going to need for each light. I split the wire for an inch or two using the very clear division between the two halves. Then I stripped some of the white covering from both ends of the additional piece (2 pieces on each of the two ends) in order to expose the bare wires. Now you need to designate which half of the wire will be which. I use a red sharpie and colour about a half to one inch on one half at the end of the wire. Then I very carefully follow this half of the wire to the other end and colour it in the same way. Before you colour the other end, make sure you have not mixed up the two halves of the wire or your lighting will not work.


So, the steps to attaching it all together:

1. I attached the white wire extension to my light by first cutting an inch-long section of red shrink tubing (it doesn't matter what colour you have as long as you keep the wires identified), and slipping it onto the red wire from my light.


2. Then I twisted the wires sticking out at the end of the red wire from the light, to the wires sticking from the side of the white wire I had coloured red.
3. Once twisted together I folded the wire back onto itself (in the direction away from the shrink tube, then I slid the shrink tube down to completely cover the section of twisted wire. Using the flame from a lighter held a little way below the shrink tube, I heated the tubing so it would form itself to the wires it is protecting.
4. I then repeated those steps with the black wire and the other side of the white wire at the same end already used. I used a small section of black shrink tube slid onto the black wire from the light before I started to twist the ends together.

Now you have your light connected to any extended wire you need, you just have to repeat these steps to attach the other end of the extension to the wires from your battery pack. Make sure you slide your shrink tubing onto one of the wires before twisting! I forget to do that every once in a while then have to take the wires apart again so I can get the shrink tubing in place.

So - there's a lesson on how I wired the LED nano chip lights. I also had two more nanos that I used in the bathroom which I fed across and wired along with the three lights on one of the side walls to a single battery. Remember the smaller sconces I couldn't fit in the bathroom before? I came up with a different solution. First, I found a small wooden channel piece, then I sanded a groove at the back of the sconces and at the back of the baseboard in the bathroom. You can see how things ended up when we get to the pictures at the end of the post.


But first, I wanted to talk about the lights for either side of the front door because these were a whole different ball of wax. I bought two really nice, bright red lanterns from Grandpa's Dollhouse, to go on the exterior on either side of the front door. I love these little lanterns however, the day after I was just trying them out to see how they would look, this is what I found on the hallway floor as I came out of my bedroom in the morning.


Luckily, once I spliced the wire back together the light worked fine. Good thing or there was going to be one sorry little kitty in this house! Well, probably not since she would have no idea why I was upset. Jodi H. from My Miniature Madness was absolutely correct when she said that God made them so cute so we wouldn't kill them!!

So, while new technologies have opened the door to all kinds of new little LED lights that take very little power and can run on a variety of different kinds of batteries, many dollhouse lights, especially those with removable bulbs, are 12V lights and should not be hooked up to battery power - - unless you do it right! These lights are normally wired to a power bar which is wired to a transformer which plugs into a normal electrical outlet. This is certainly a more bulky solution and one that requires your project to always be placed near a power source if you want it to be lit. But, there is another option. In the picture below you see two different kinds of batteries:


On the left is a standard AA battery. These batteries are 1.5 volts. You don't need a lot of math skills to figure that you would need 8 of these batteries connected to supply 12V of power. Yes, you can get a battery pack that would hold that many AA batteries but it would be quite bulky - not easily hidden in your room box. And that is for one light only. I had two 12V lights going on the front of the post office and do not want to be committed to plugging into a wall outlet. There is a solution! The batteries on the right of the above picture, even though they are much smaller than the AA battery, are actually 12V each. In a double battery pack, pictured above next to the batteries, that is 24V - exactly what my two front door lights add up to. Now, I won't go into the issue of the slight loss of power over the length of wiring, or by operating singly or in tandem. Truth be told, any reduction in available power would not be significant enough to worry about for the purpose of wiring these two beautiful lanterns. I did have to order the holder for the batteries online through amazon.ca as I couldn't find a local supplier. The battery pack has a switch already attached as well.

So I had already created two channels on the outside of the front wall, on either side of the door, to fit the wires into. LIke the wires from the indoor sconces, I used a technique that Lea Frisoni describes in her book, The Big Book of a Miniature House. She describes how she runs a channel for her wires then covers them by laying a strip of tape, sticky side up and covers that strip with two strips sticky side down that meet in the middle of the central strip. What that leaves is a non-sticky area directly over the wire channel which allows for the wire to be pulled out if it needs to be fixed or exchanged. Of course, you would attach the new wire to the end of the old one before you started to gently pull so that it would pull the new wire along the channel while the old one is being pulled out. Does that make any sense?? If not - get the book. You really should have that wonderful book anyway! It's my favourite.

Back to the lights - I temporarily taped the lanterns to the wall since I can't install them permanently until the outdoor wall finish is completed. I ran the wires into the channels and used the masking tape technique to cover them. Then I painted the whole wall, including the masking tape area, white since I will be applying white blocks to the wall and I worry about little bits showing through occasionally. You can see the tape to the right of the door. It is painted over on the left.


Since the bulbs in the lanterns are replaceable, they were held together with little sticky white foam circles on the bottom of the lantern to allow easy access to pull out the bulb if necessary. Since the lantern will be hanging, not sitting, I replaced the white circles with red foam squares instead. Much better.


So, now to the pictures of the inside lamps in place:


As for those little sconces for the bathroom - I couldn't fit them on either side of the wall cabinet so I had Bruce drill 2 holes through the floor on either side of the door, painted the channel I showed you earlier so it would blend into the wall and hide the wires, and hooked the lights up on that wall instead. I like it!


I hope I didn't bore too many of you with all the description about lighting. I do hope anyone reading this post who is newer to the hobby has learned something - which was my aim this week.

Until next Tuesday, I will be thinking about what to use for lighting in the back part of the building. Hmm - got my thinking cap on now! Until then, keep safe, keep healthy and keep on mini-ing! TTFN - Marilyn D.