I have also decided that the winners of our little contest will each receive a hosta plant, an astilbe plant, a garden lantern, book of poetry, and a glass of water with lemon (or is it a gin and tonic? Hard to say.).
So on to our latest pictures:
In our last post I said I was moving on to make a climbing rose to go over the split-rail fence. For the basic frame of the climbing rose, I found some plastic plant material in my stash that had several "branches" off to the sides. The "leaves" were almost fern-like. I left the centre vein of each leaf, cut off all the feathery "leaves", and painted the whole thing brown.


Then I found a strip of leaves I had taken from a plastic topiary I had, cut off the large and medium size leaves to save for another project, then cut off the two smallest sized leaves to use on my twining rose vine. I glued these smaller leaves onto the framework I had made, in pairs that mimic the way real rose leaves grow.


Then I "planted" the rose at the base of the fence, gently bending it over the fence and pulling one small branch through to the backside before adding flowers. I figured if I glued the flowers on first, many would fall off as I was manipulating the plant itself around the fence. I did end up having to tie off the vines in a couple of places to hold it in place better. I used brown thread so it is virtually invisible.
I wanted an "old rose" variety and I found a picture of one - actually a hand stitched embroidery - hanging on the wall of my friend, Louise's house. The lovely old rose had only two layers of petals, was pink around the outside edges, white toward the centre and had a touch of yellow in the very centre. So, I used white paper and the two smaller sizes from this punch:

I shaped the two different sizes, then glued the smaller inside the slightly larger one before painting.

It was hard to make the yellow dot in the centre to be small enough. Some worked, some didn't, but overall, I think it turned out pretty good.


Then I planted the rest of the garden. Starting of the left side we have a hosta "Great Expectations on either side of the bird bath - which was made by miniature potter Jo-Ann Shaw, then there is a white miniature astilbe followed by a blue hydrangea, white carnations, a tall blue delphinium, a purple agapanthis with a clump of silver grey wormwood in front, and a pink miniature astilbe bringing up the end.

With the garden mostly planted (I'm still not finished the beautiful hydrangea tree I have planned for behind the fence), I turned my attention to the inside of the cross-section of the garage/potting shed.
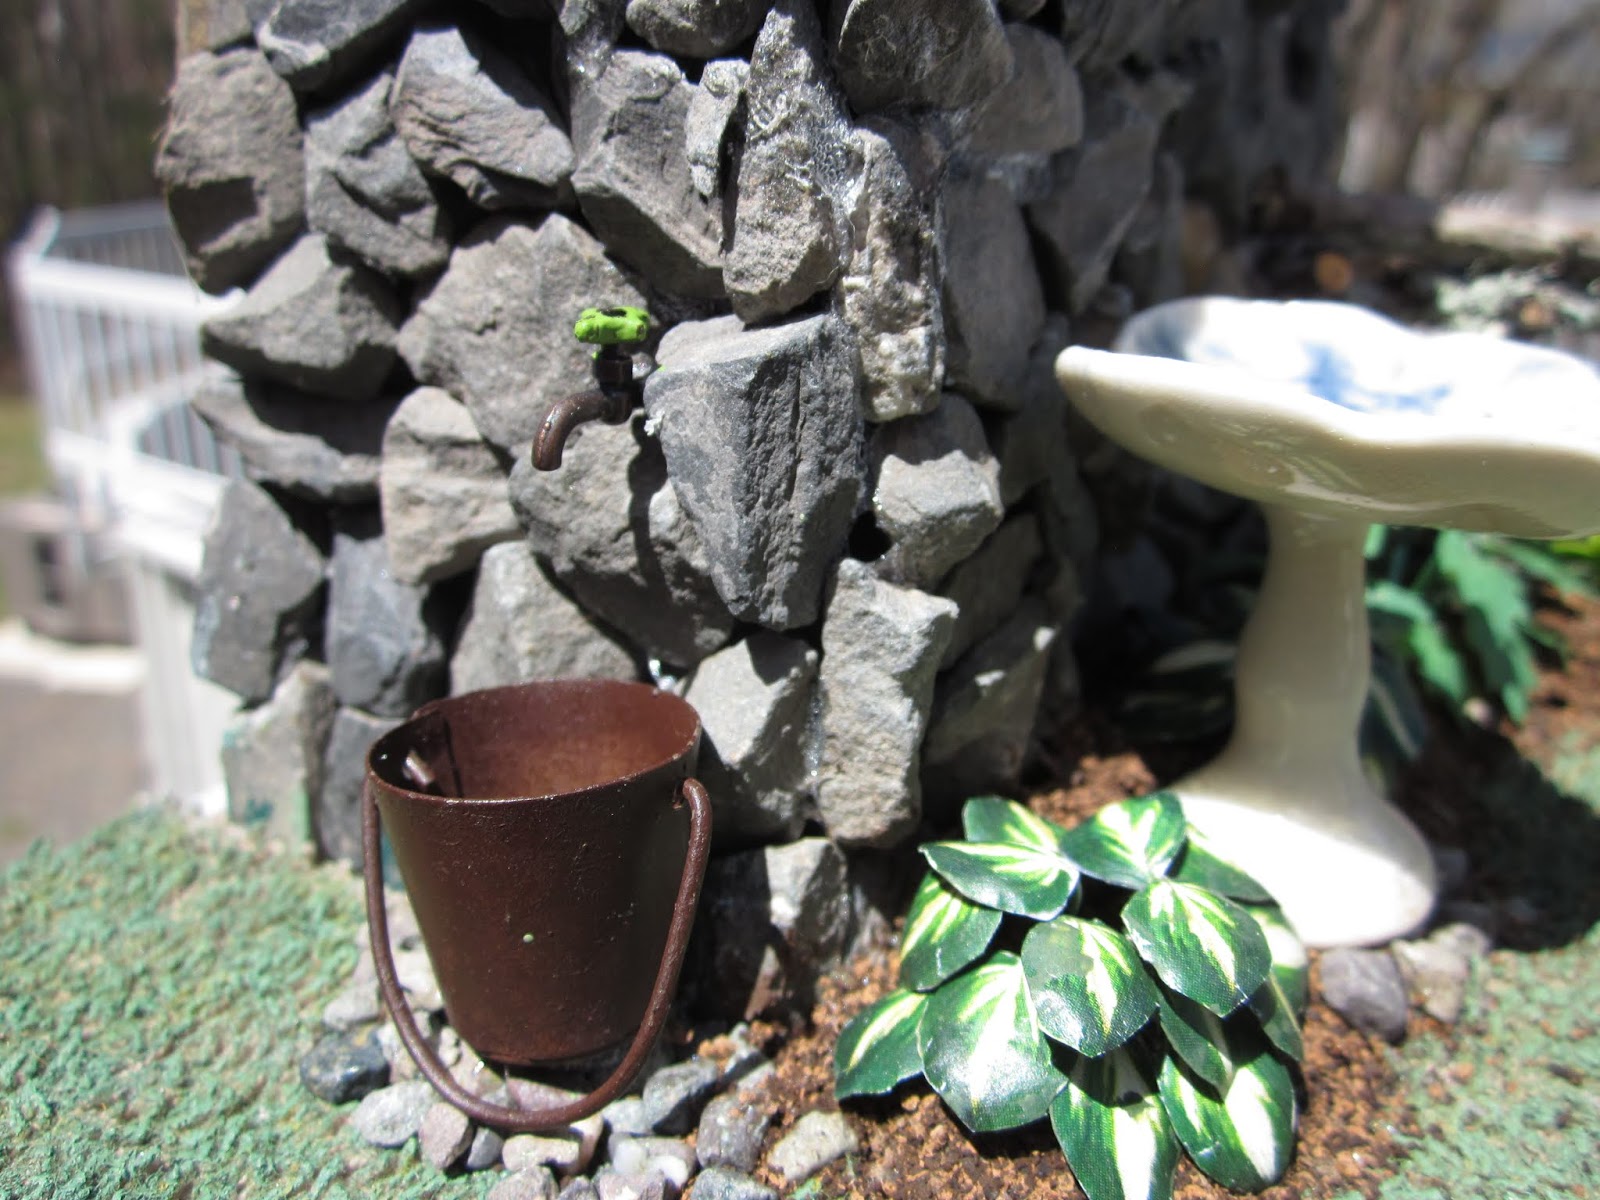
Moving around the corner from the garden to the shed, we see a garden plaque hanging above the beautiful bird bath, pass by the water bucket standing on a bed of stones under a water faucet, check out the bird in the bird house, who is checking us out at the same time, and enter the working section of the garden.


Moving into the work shed, we see that Dorothy has everything she needs in a very compact corner - from the rake and shovel hanging on the end wall, to the hand tools at her fingertips above the bench. In a hanging crate she keeps some seeds, fertilizers and supplements. For those big jobs, she keeps a regular saw handy as well.

She is getting ready to re-pot one of her African violets (made by Betty Stan), and I see some soil has fallen from the overturned pot onto the floor below. Oh, oh - that's not all that has fallen. I see a broken pot peeking out from under the potting bench. And, her new bag of potting soil obviously has a hole in the bottom corner.


Moving back around the corner to the garden again, we see Dorothy's special reading corner - with her favourite book of poetry (made by me), a cool drink to quench her thirst, and her sun hat waiting to shield her from the brightest rays while she relaxes and enjoys the results of all her hard work. The chair was made in raw wood by Wayne Dieleman. Marijke suggested I hand paint a design on the chair back. Instead, I painted it cream then found a watercolour print that I really liked online, cut it into strips to fit the slats of the chair back, and used ModPodge to seal it onto the chair. Personally, I love how it looks!

Here is the garden from Dorothy's viewpoint, without the planned hydrangea tree in place.

The tree is "under construction" but it is taking me about 35 to 45 minutes to apply the tiny flowers to each flower head. Then I have to apply the leaves. When done, it will be placed behind the fence and hang over into the garden. I think it will be a real focal point. It doesn't look like much now, but I know you all can use your imagination!


Here you also get a better view of Dorothy's chair with her poetry book waiting for her return.

So, we are saying goodbye for a while to Dorothy's Corner. There will be a few final pictures when that darn hydrangea tree is finished. Don't forget, you can always click on the picture to get a larger view. Also - this is your last chance to enter the draw for the prizes I mentioned earlier. There will be one random winner chosen from anyone who has left comments on the blog since the contest was announced. Hopefully, there will be a second winner who will be the first one to correctly guess why this project is called "Dorothy's Corner". Again - there are actually a couple of hints in the project itself. Good luck! TTFN. - Marilyn
I have no idea why it´s called Dorothy´s corner but It´s such a beautiful project. I love plants and flowers in miniature and yours are awesome. I also love that you use different materials to achieve what you were looking for. Great results!! Love the whole project and all the little elements that can be discovered when you get a closer look.
ReplyDeleteThank You Alexandra. It was a really fun project. I'll keep working on that final hydrangea tree and show it when it's finished. - Marilyn
DeleteAt this point the mystery of why it's called Dorothy's corner is still there for me but I have so enjoyed looking at all the many details you have incorporated into this project...beautifully done! Making realistic looking miniature plants is a time consuming affair but they add so much to the scene. Looking forward to seeing the completed hydrangea bush too....Cheers, Alayne
ReplyDeleteYou're not the only one, Alayne. I guess I was way too subtle with the hints! Thank you for your kind words about the project as a whole. - Marilyn
DeleteI love Dorothy's corner. it is such a neat idea. It shows all the behind the scenes work that is necessary to create something beautiful, even in nature. Any avid gardener would love this.
ReplyDeleteThank you so much, Carrie. As I progressed with this little project, it really grew on me (no pun intended! *smile*). I'm glad you like it too. - Mrilyn
DeleteIt's all Charming Marilyn and Dorothy's corner is proving to be a slice of summer garden life which suits me to a "T"! :D
ReplyDeleteI love the casual yet well placed order of your planting scheme along with the lawn chair is strategically situated so that Dorothy can enjoy all of it.
And might I add, that the entire scene sitting outside upon your Real Life patio table, looks like a tiny island oasis floating on top of the vast water; a Terrific special effect!
elizabeth
Thank you so much for your kind words, Elizabeth. I must admit, I didn't actually notice the effect the ripple glass of the table gave to the overall picture. Trust someone with an eye like yours to notice it! Great catch! - Marilyn
Delete