Friday 29 September 2017

...and miles to go before I sleep....

...or before I finish...or something like that! Or both!

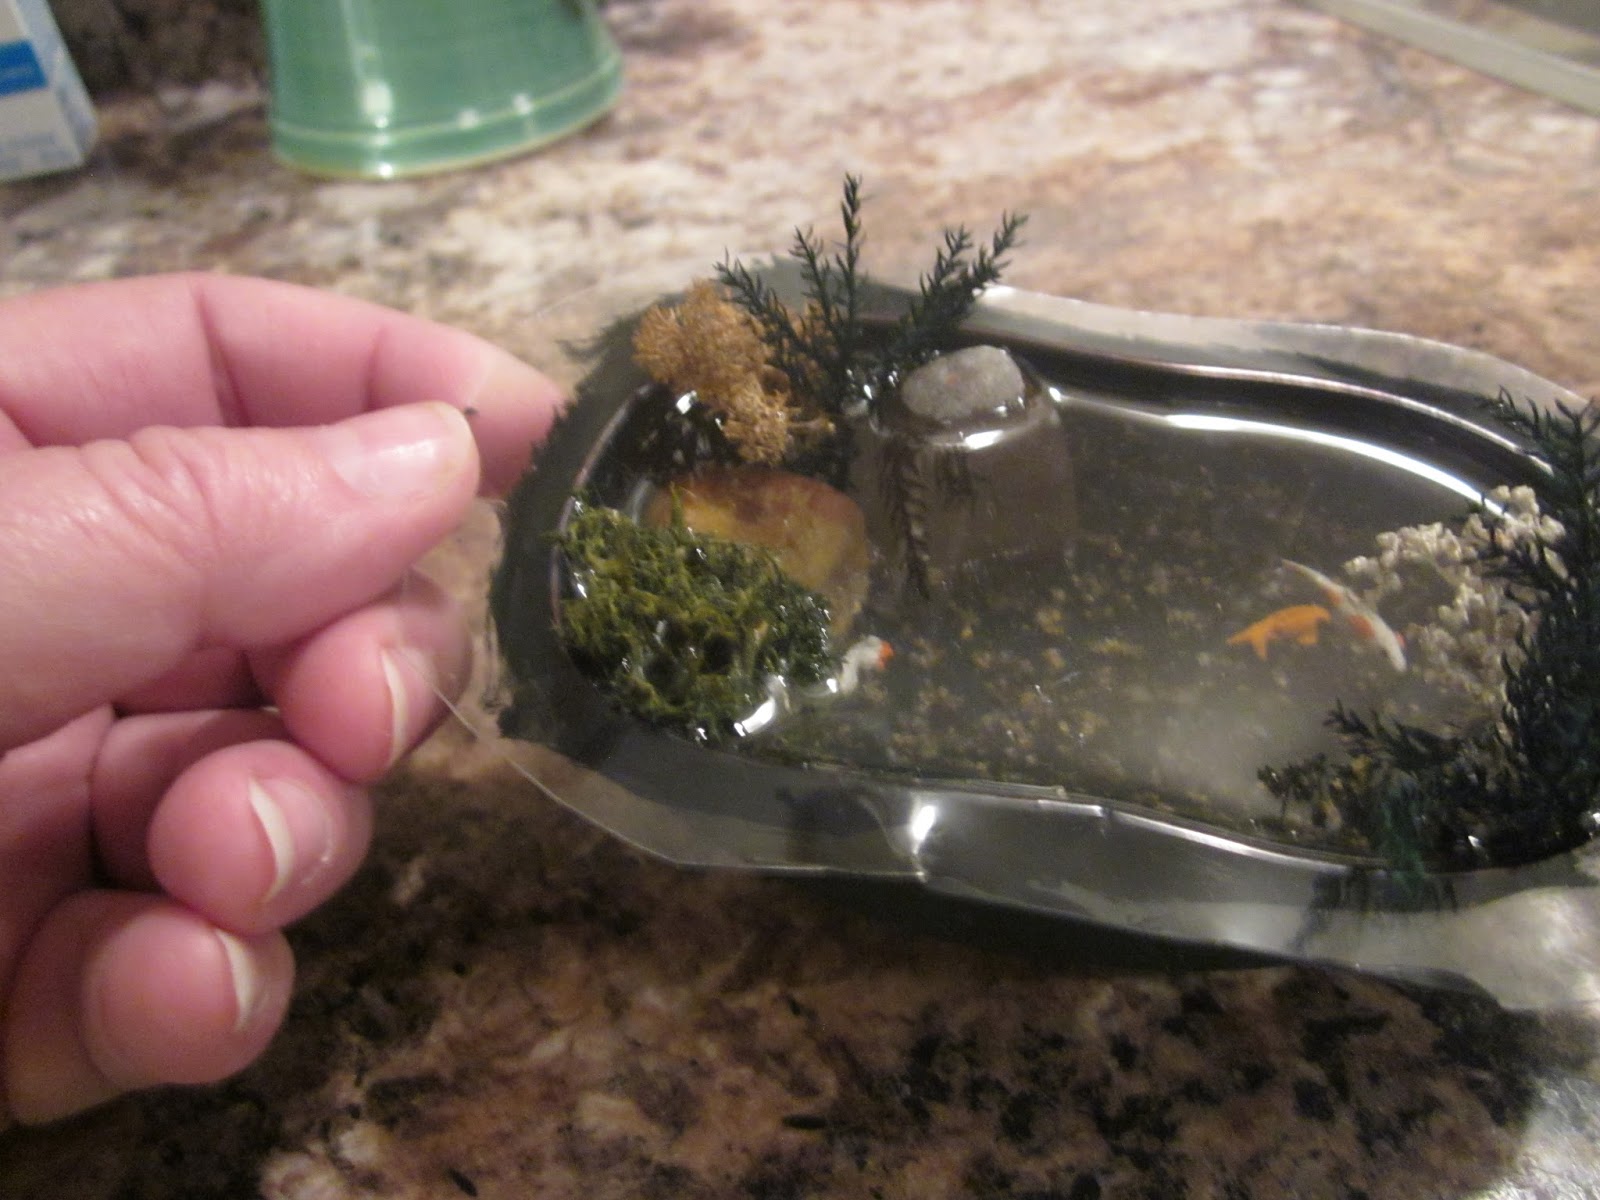
Arriving home from Camp Mini Ha Ha on Monday afternoon with nothing completed on my project but the portico and my pond (which I still love looking at), I sat down at my dining table on Tuesday and worked away at the tower and the main house while I listened to the banging and stomping of the contractors working away in my basement after the flooding incident from August (about time they got to work, isn't it?).

I haven't had time to work on it since Tuesday but I'll give you a run-down of where I'm at now.

Before I left Camp I had started to glue rocks around the base of the tower to tie it into the style of the front portico. Okay - not my favourite job but it's done now so that's a relief. Here it is with just a small section left to do. Notice that I painted the cylinder black in the section where the stones were going. If there were any spaces visible I didn't want it to show through as light brown or worse - white!


While I was at Camp I had applied tissue paper to the upper walls of the tower and to the inside and outside walls of the house, to make it look like stucco. On Tuesday, I mixed up some paint using "ivory" mixed with white for the first coat. I thought it was way too yellow looking so I mixed up a second batch, starting with the white this time and adding small bits of ivory to get a colour I liked better. I don't know if you can notice the difference in this photo but the tower is still showing the yellowish colour while the front wall of the house has been repainted with the new colour. You can click on the picture to get a larger size if you want.


While still at Camp I had Wayne - our wonderful carpentry assistant and all-round handyman, cut out some circular windows in the tower. Once home I wondered how I should finish these cut edges. The simple answer would be to use paper or a lightweight cardboard but - let me ask you this: have you ever known me to take the easy way??? Of course not! So, while I was painting all the walls, I dropped several narrow coffee stir sticks in a pot of water on the stove and let them boil away.


Yes, you're absolutely right - at one point I was so engrossed in my painting that I forgot they were on the stove and yes, they did boil dry. Luckily the smell alerted me very early so I was able to fill the pot back up and bring them back to a boil without any real damage. I watched them carefully after that. I let them simmer away for a couple of hours and, I must admit, they were still difficult to bend around the inside of these circular windows and the door frames at this point. I probably should have left them for another hour or so. If the diameter of the circles had been larger it would've been easier. First, I took an old small diameter pill bottle and wrapped a stick around that while it was still hot and wet. Then I cut it to length quickly before it cooled down too much, and slid it into the opening which I had already covered with Quick Grip glue. It might not be perfect but all my round openings are now lined with wood:


In the picture above showing the closeup of the rocks on the bottom of the tower, you might notice that I lined the bottom two-thirds of the tower with a peel and stick paper that looked like very narrow vertical boards. I'm going to put a more decorative paper on the top one third since this is where I will be putting a bathroom - even though you will only be able to see it through the windows -that's not the point! The point is that even mini people don't like to have to use an outhouse in the middle of winter or to bathe in the river! My little residents enjoy their creature comforts!

So, this weekend I'm hoping to finish lining the other window frames, plan out my lighting, build a second set of stairs to reach the bathroom level of the tower, and faux paint both sets of stairs to look like limestone rock. Then I have to get serious about planning furniture placement and start putting the walls of the house together. I still have a very long way to go before I get to the landscaping - which is the part I'm really looking forward to because I've never done it before. Have I mentioned this is only the 4th year I have actually been building minis? I'm not sure I have enough years left to become as practiced and talented as so many of you out there but I'm going to give it my best effort. So - if I want to live that long I should make sure I get my "beauty rest". Okay - that's definitely not working for me but, hey, I live in hope. so, until my next post -- TTFN!! - Marilyn

Thursday 28 September 2017

Keeping my promises

Last night I promised you I would give you an update on the pond for the writer's retreat project and I do like to keep my promises whenever possible. *smile*

So - if you remember from my August post, I had purchased a new laptop mouse for my computer and, when I tipped the packaging upside down to get the mouse out, I realized what I held in my hand would make a perfect little pond for my landscaping at the writer's retreat. So, I painted it black/very dark green on the outside before going to Camp. One of the side workshops was about building a pond so I really lucked in on that!!!

Our teacher for this workshop, Adrian C. from Ontario, gave us all a really good introduction to making ponds, materials to use, those to avoid, how to make a formal pond and an informal pond. Then we got started. Adrian provided lots of small shapes that could be used for little ponds in 1:24 scale. Many of them came from the shapes found in chocolate boxes but she also had several other shapes to choose from. She suggested we each try two different ponds but since mine was so much deeper than these other forms, I didn't want to be greedy so used my own mold and then had a tiny shell bird bath filled as well because it took only a couple of drops of resin for that. I will show you the bird bath as I progress to the landscaping portion of my build.

For now, here is my pond, all completely filled and hardened. Firstly, I am showing the underside of my pond. Looks just like a computer mouse, doesn't it?


Following Adrian's instructions, I started by "painting" the bottom of the inside with a thin application of white glue then sprinkled it with an appropriate scale of grit for the bottom of the pond. Adrian was very specific when she told us to make sure we shook out any extra grit, and even to blow on it so no loose bits were left, otherwise they would float in the resin and ruin the look of our ponds. Then we each picked out plants from her extensive supply of scale-appropriate dried materials and glued them to the sides of our ponds. Those with shallow pond forms also glued tiny fish to the bottom of the form in preparation for the first pour.

Because my pond was much deeper, I chose to wait until the second pour before placing fish in the hopes of showing depth in the pond. Adrian instructed us to pour no more than 1/4" maximum of the material at one time, then to wait until it was thoroughly cured, at least overnight, before making the next pour.

The next morning, with the first pour solid but still a little tacky, I placed two white and orange-spotted Koi in strategic positions and Adrian did a second pour. Late that day I placed a third fish - solid orange this time, and she did the third pour. The result is that the fish are floating at different levels of the pond and I am loving how it turned out. It was a really fun workshop. I'm not sure if you can really tell the different levels that were achieved but here are two pictures of my finished pond:


I am definitely going to try this again in the future. As for the product used, Adrian told us that, rather than using a more expensive product that is made for miniature water scenes, she uses a product that is intended for cabinet makers. It is a resin and hardener that is self-levelling and one coat on furniture is meant to be the equivalent of about 50 layers of polyurethane finish. It comes in three different size boxes and, though somewhat pricey in itself, is much cheaper than the other products and she is often able to purchase it at Michael's using a 50% coupon. You can't beat that. Here is the product we used (follow instructions carefully and do not mix the resin and hardener until you are ready to use it.)


Also be careful when pouring because if you drip it anyplace where you don't want it, it will be difficult to get it completely off. Adrian mentioned that one thing that must be kept in mind is that this product probably can't be used if you're trying to fill, say a bathtub or sink - or any application where the water is intended to be clean and clear because it may have a slightly yellow colour to it. This is not noticeable in a pond application but would be noticeable in a white bathtub.

For my pond, I will add additional plantings around it when I work on my landscaping.

So, although this is a short post, I think it's time to go to bed as I am still trying to catch up on my sleep from my week at Camp. Tomorrow I hope to show you some of the work I have done on the building since I've gotten home. TTFN!! - Marilyn

Wednesday 27 September 2017

Another busy month coming to an end

Wow! It's unbelievable how quickly the time goes zooming by. Remember when you were young and your parents would tell you how quickly time goes when you get older and you'd think - well, that's silly - how could time go faster? Once again - your parents knew best!

Besides the many, many things that kept me busy with my volunteer activities with the Irish Association and with the Celtic Affairs Committee, and with the haggling back and forth with the insurance company and their assigned contractor over the fiasco in our basement level, I did manage to squeeze in a little bit of time for minis.

On September 7th, our FAME group exhibited at the Fall Expo put on by the military base in our area. Club members Susan P., Garry R. and his wife Karla, and I put together some of our pieces for display. We had a lot of activity at our tables and I think the word is spreading that:

1. the mini hobby is not just for females;
2. you don't need to commit to a big "dollhouse" structure to enjoy this hobby, and
3. for arts and crafters, the miniature hobby provides an opportunity to use all of the skills they most enjoy from all of their other hobbies: woodworking, sewing, knitting, crocheting, pottery, wood turning, painting, cross stitch, quilting - - you name it, it's possible to incorporate it in a miniature project. What other hobby can boast the same??

In this picture, Karla is manning our table while I take a couple of pics to share. The left of our display, shown here, includes three of her husband's pieces. Garry does an incredible job of making everything so perfectly aged and finely recreated in miniature. His blacksmith's building is one of my favourites, although it is hard to pick just one!


Louise, Susan and I provided a few more items for display. Also, Susan generously donated a 1" scale play dollhouse for a free draw. We generated a lot of interest from the children with this draw and, as a result, have a collection of names and contacts of interested people so we can send them notices for future events/workshops/shows. The little girl who won was positively bouncing with excitement. Hopefully we have created a miniaturist for life!


The other thing that we have been noticing since Garry joined our group is that, with a man behind the table and several of his incredible pieces on display, we are getting more and more men approaching to check out our exhibits and to ask questions. At this Fall Expo there were a few father and son teams who approached us and expressed a lot of interest. I hope we see some of them follow through and start dabbling in miniatures themselves.

Following the Expo, what little time I had for miniatures was spent on getting my "gifties" ready for Camp Mini Ha Ha. This year the theme was "fairies" and the project was a small, half-scale building with a classic "storybook architecture". Accordingly, I decided to make half-scale "woodland fairy dining tables" as my gifties. We are required to bring 5 gifties but I always make 6 so I have one to give to my good friend, Louise. I used cross cuts of polished stone for the tops, wooden coffee stirrers for the table aprons, and twigs cut from my garden to make the x-crossed legs and centre stabilizing bar.


I actually quite liked the way they turned out and may try to find larger pieces of polished stone to use as a full scale table in a future project.

In my previous post you got an idea of what the building for this year's Camp Mini Ha Ha project would look like from the cardboard mock up I was using to plan out my landscaping before I left for Camp. Here are a few pictures of things in progress at Camp:

The first thing I did was to completely build the portico that becomes the entry at the front of the house. I used a laser-cut door to look like a wrought iron gate into the portico and covered the outside with stones. I completely finished the inside of the portico so it would become a "mud room"-type entry, including coat hooks, a small bench to sit on when taking off your boots and, of course, a pair of boots.


We were provided with the coolest sheet of moss-like material for roofing. I will probably use it on the roof of the house as well but not, I think, on the tower roof. Also - I used a new textured paper for the flooring in the portico. It looks like square-cut stone tiles with lichen between them. I think the last thing I will do with the portico is to put a few drops of glue around the floor and drop some fine green scatter in a few places to build on that lichen-covered rock look.


Then I started work on the building and tower. For the inside walls of the house I used a vinyl wallpaper sample that looked like old ventian plaster technique for the wainscoting and topped it with real branch cuttings for chair rails.


In the second picture I have started to build the stairs for the tower which will be attached to the side of the house. I used the tissue paper technique to make all the walls look like old stucco. Paint and aging will come later. I think that tower needs windows, don't you? Yup - definitely needs windows.


So there is an introduction to my work at Camp on my "Writer's Retreat" project. I'll keep you posted on its progress. Oh yeah, I forgot -- the other thing I did at Camp was to make that pond I showed you in my last post - the one I was using the packing from my new computer mouse to build - remember?? I LOVE how it turned out. I'll show you that tomorrow. Promise! TTFN!! - Marilyn