Now that my sister has her gift (her birthday was on the 17th) it's time to reveal the building in its entirety.
At the beginning of the last post I showed you the building "in the raw". I cut the pieces from 1/4" MDF, which is what I use for most of my buildings, and used Quick Grip to glue it together. You saw the wood floor in the last post and the "leprechaun green" I painted the interior walls. I used a textured brick paper for the exterior. I was struggling over what to use as decorative brackets around the roof line when my DH suggested he had some leftover life size baseboard molding. He sliced off the top, flat part of the molding, then sliced 1/4" slices for the long brackets. He then made the smaller brackets from 1/4" slices from just the very end of the trim. I think they look great and will be using these type of brackets again in the future, for sure.
I still had to install the "windows" and trim them out, as well as a decorative trim around the top of the roof line and along the bottom of the window frame. I decided on a 3-layer trim of dentil molding, 1/4" stock lumber and small quarter round, painting them in Wedgewood green and Burnt cherry. I was more than satisfied with how they turned out. Here you can also see the detail of those brackets my dear hubbie, Bruce, made for me.
I glued the plastic pieces onto the window frames then painted some mini baseboard in Wedgewood green to trim them. In this picture you see I have painted and installed the front and back doors as well.
I added the dentil molding combo to the bottom of the window too. Here you can see all of the window molding - - and the fact that I was starting to try out furniture inside the store.
So, I guess its time to show it all together! First, I do want to point out the street signs on the front and side of the building. Quilty Pleasures is located on the corner of C.V. Gay Blvd. and E. Martin Lane. Those happen to be the names of our late parents and I thought my sister would appreciate her gift even more with this little addition.
I made the sign using MSPowerpoint. I used a font called "Algerian" and made sure the text box was set at "no fill" so that I could place another box behind the words. I did a search for quilting stitch patterns and decided on this one which I set as a green colour and placed it behind the text box in PowerPoint. When I had it the size I wanted I printed it out, mounted it onto a piece of wood, coated it with mod podge and framed it with a burnt cherry colour wood.
So, do you feel like shopping? Come on in! As you enter you can see the cutting table, complete with a measuring tape attached to the table and, behind this, you'll find cubbies with a variety of colours of yarn for those who might like to knit, crochet, or maybe use the yarn for a simple tied quilt.
An overview of the shop let's you take everything in at once. I see the shop owner has left her bag hanging on the hook on the back door. She is also obviously a plant lover. There are orchids, a caladium and several green plants dotted around the shop. See if you can spot them all as you walk through.
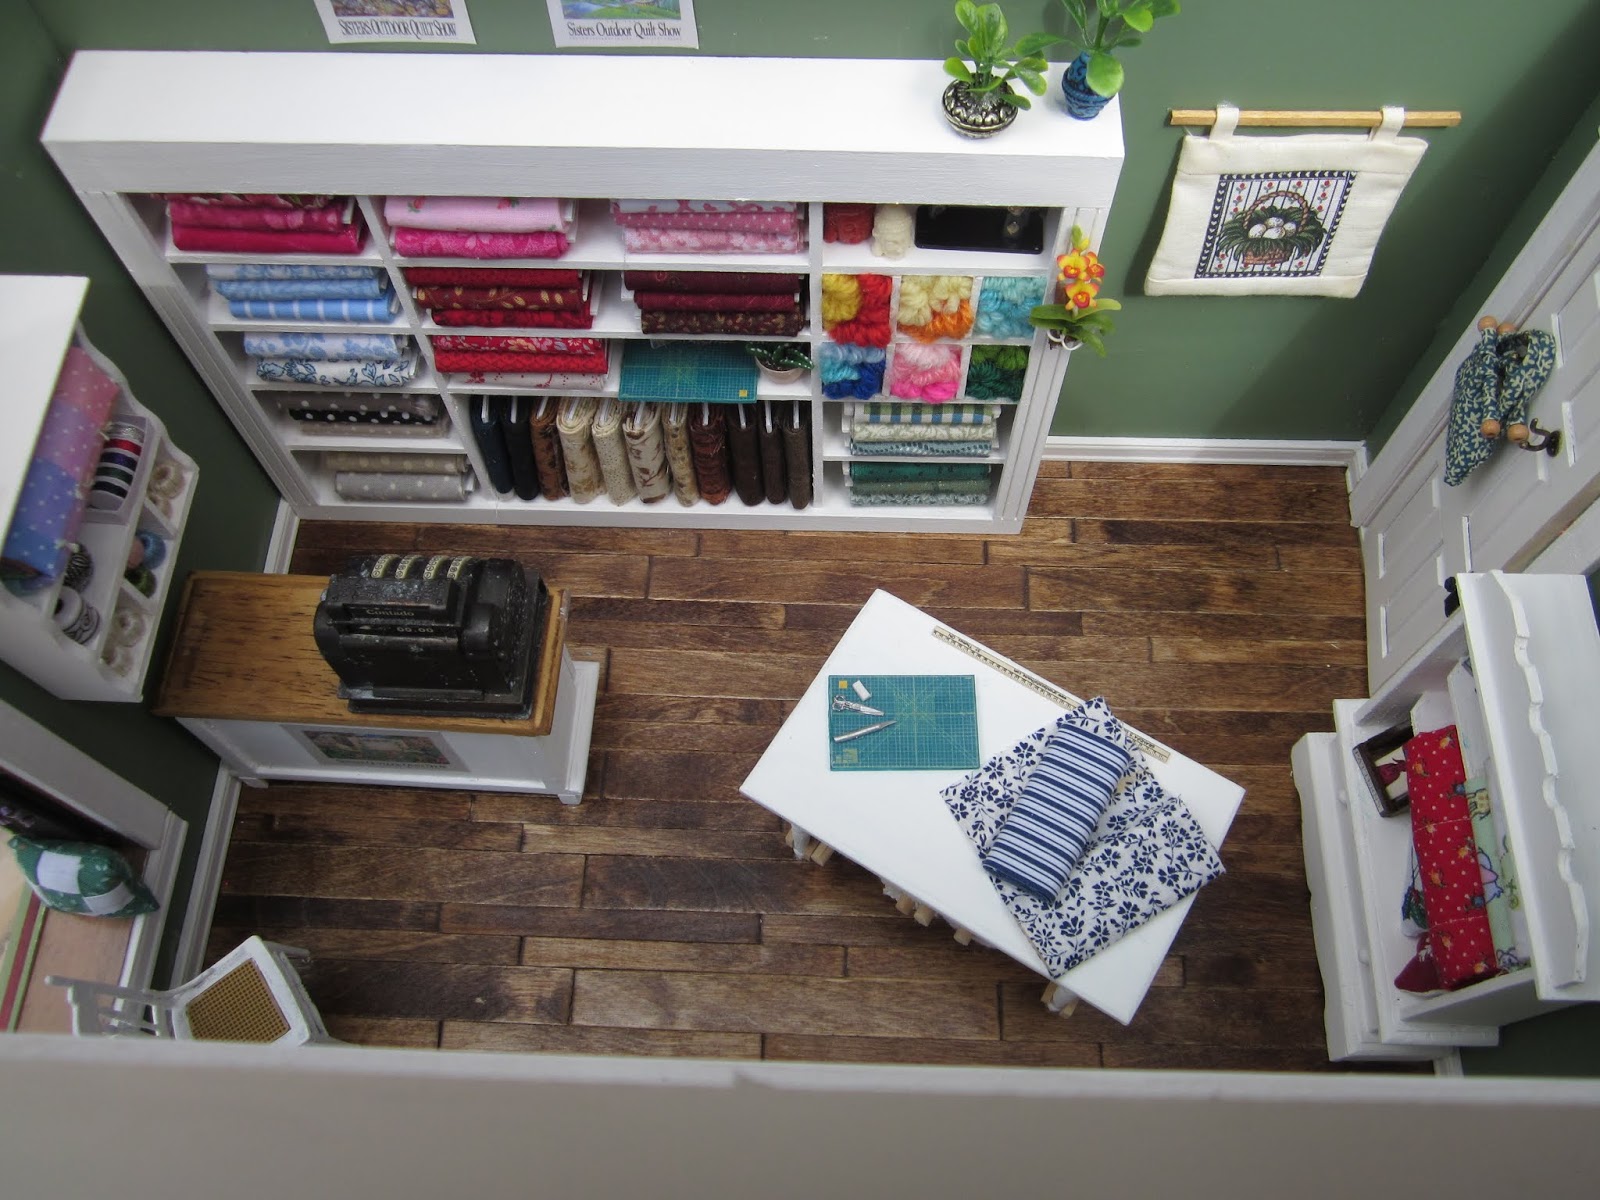
On the cutting table someone has left two nicely coordinated fabrics, ready to be cut. There is a small cutting mat sitting on the corner (and another one on one of the shelves behind in case a customer is looking to buy one). Under the cutting table there is quilt batting, lining, and wool batting on large rolls, readily available for the local quilters.
There are quilt books on the window seat and a few more in the shelves of the cabinets. Speaking of the window seat, the wood grain look on the seat and up the walls of the window bump out, is actually strips cut from the sample cards for formica counter tops that you find at your local building supply store. The cards are quite large, about 3 or 4 inches by approximately 8", which gives lots of possible uses! I also want to point out that I found online, a variety of posters for what apparently used to be an annual quilt show in the USA called the "Sisters' Outdoor Quilt Show". How perfect is that for a gift for my sister?!? I put one on the front of the cash table and two others above the fabric bolt cabinet.
Finally, these are the last few pictures I took before delivering it to my sister on her birthday. There are spools of crochet cotton in the wall shelf and a box of ribbons, a quilt for sale, and a couple of decorative pots. More than half of the fabric bolts were made using fabric from my sister, so every time she looks at them she can remember each quilt she has made with those fabrics. I'm happy to say, she seemed really thrilled with it.
Thus ends the saga of Quilty Pleasures - happily delivered to its "forever home".
But - talking about a saga - remember Dorothy's Corner?? I still had to finish the hydrangea tree for the back of the garden before I could call it complete. Well, my mini friends and I have been meeting through Skype on Wednesday and Friday afternoons to work on our minis together (virtually). I made the decision that on Fridays I would only work on something from previous projects I have not yet completed. We've dubbed it "Finish Friday". I have been working on the tree on Fridays and on whatever my current project is on any other day of the week I want. I have finally gotten all of the buds covered in tiny little white blossoms.
Each of the 29 buds required between 80 and 90 tiny flowers that each had to be shaped before applying. That was a lot of Fridays!! In the end, the hydrangea tree I was going for is a peegee hydrangea called Pink Diamond. So I then made a very watery mixture using a craft acrylic paint in "old rose". By making it really thin I was able to basically touch my brush to the wide end of the blossom and let it seep into the rest of it. I think it looks way more realistic than if I had used a solid pink paper to cut the teeny flowers. You can see the details better in this picture, and any of the others, if you click on the picture to enlarge it.
Now I just have to add the leaves. I think it will take only 8 leaves per branch instead of the 80 or 90 tiny blossoms so it will take far fewer Fridays to actually finish this! Thank heavens for small mercies!
To close, I wanted to leave you with this picture of Dorothy's Corner. It is sitting on a corner of a cabinet and, when my husband was trimming the rhododendron earlier this season, he took one of the branches and placed it in water to see what would happen. The buds were still tightly closed and showed no colour at all. A week later it was in full bloom and hanging over Dorothy's Garden. No way I can duplicate that!
Until my next post a week from today, keep safe, keep healthy, and keep on mini-ing! TTFN!! - Marilyn D.
Showing posts with label Quilty Pleasures. Show all posts
Tuesday, 2 June 2020
Tuesday, 26 May 2020
Quilty Pleasures
To start my post this evening, I have to take a moment to show you our first blooms of the season: my pjm rhododendron is in full bloom. If you walk towards it you clearly hear the sound of hundreds of plump honey bees feasting.
When these blooms start to fade, our lilacs will just be coming into bloom. They will be followed by the peonies which will be followed by everything else - white coneflower, delphinium, pink tickseed, deep purple campanula,and whatever annuals we can get our hands on including the geraniums (pelargoniums) we overwintered in our basement windows. So much to look forward to!!
As for my mini work, on May 4th, I decided I should do something special for my sister's birthday that was coming up on the 17th. Not that it was a special birthday, just because she's a special sister (although at our ages, every birthday should be celebrated!). She has always been interested in my fascination with miniatures, though not enough to try any herself. Instead, her creative outlet is quilting - and she does some truly amazing work. So, to celebrate both her birthday and her talent, I wanted to make her a quilt shop - and I had just under 2 weeks to complete it!
Now, I want to say right up front, this is not an original design of mine. Several years ago I fell in love with a shop made by Casey Rice of Casey's Minis. She called her little shop "The Rusty Needle" and you can find it by looking through her list of labels. Casey was kind enough to share with me the basic dimensions of the box itself so I figured out windows, doors, etc. from there and, from 1/4" MDF, cut out two kits that I could use to make whatever kind of shop I wanted. Did I mention I cut those out in 2016?? Bottom line - I had a room box kit cut out and ready to go which was a big help.
I don't have pictures of the pieces but I glued together the front, back and 2 sides using Quick Grip glue then set the box on the floor and traced around the inside so I could determine where the inside floor would be. It should be noted that mine is a mirror image of Casey's - not for any creative reason, but simply because I'm lazy. The door I had for the front was hinged on the wrong side and I was too lazy to take it apart and re-hinge it. Hence the mirror image. *smile*
Then I painted the inside walls "leprechaun green" and I used Popsicle sticks and tongue depressors for the floor. I quite liked the pattern of two rows of Popsicle sticks, one of tongue depressors. The narrow and wide planks together turned out well. I sanded them, stained them and put on three coats of matte-finish urethane. The picture below is before the coats of urethane.
At this point I will temporarily step away from the building itself and talk about all the things I needed to put in a quilt shop. First - furniture. I found these three pieces in my stash. The large piece will be used for fabric bolts. I took out the bottom centre shelf because I wanted some bolts to stand upright and the shelves were too close together. Then I found an old Michael's hutch that had two doors in its upper portion - which I removed. This would hold a finished quilt and whatever else I could come up with. I also had an old House of Miniatures kit for a bookshelf that was meant to sit on top of a drop-down desk. Here it will be hung on the wall to hold crochet thread, ribbons, and who-knows-whats.
Now, I needed a table to hold the cash register. I was just about to make one when I spotted this buffet and hutch in my furniture stash.
I can't remember where I picked up this piece but I never used it because it always seemed a little "clunky" to me. I think it was the mullions in the doors that threw me off for the most part. They seemed way too thick to be in this size door. So, if I cut the top off, and sanded and sanded and sanded the top of the bottom half to remove the glue, I could stain its top and use it for the cash table.
So now I had all the furniture painted with a few coats of white. Oh yes, I also found a small table to which I added braces between the legs and glued in a bottom shelf. And you can just see the top of a little white pressed-back chair sitting in the middle. I also gathered up already made bolts of fabric - some I bought, some were made for me by my friend Louise, and a stack of fabric scraps I had wheedled out of my sister without her knowing exactly what I wanted them for. I cut 3/4" wide strips of mat board which I then painted white on the coloured side, and cut into 2" lengths for the bolts. Then I was off to the races.
In the tall buffet cabinet I folded up a "quilt" - actually a piece of pre-quilted fabric in a tiny floral pattern, a couple of cushions, two bolts of patterned flannelette suitable for a nursery quilt, a collection of sewing patterns and a couple of quilting books.
Speaking of quilting books - here are the 8 book covers I made, then used mat board to wrap them around to look like books.
Here's a picture of the smaller wall cabinet, mostly filled. In the top shelf is an actual mini quilt, folded. I made the balls of crochet cotton by wrapping 3 strands of embroidery floss around pony beads. I also made a wall holder for DMC floss. Agghhhhh - I don't know that I will ever make skeins of floss again!!
Here is my first try at floss skeins. I used a couple of posts in my wire-bending jig. Nu-uh!! DID NOT WORK FOR ME!! After several failed attempts I put two layers of black foamboard together and stuck two tapestry needles 1/2" apart. I taped down one end of the floss, wrapped around the needles 7 or 8 times, slid little pieces of paper underneath and wrapped it around and glued before cutting off the ends of the floss. I started getting a little better with the last two I made but I can't see me making a career of it!! It was truly one of the hardest teeny things I've ever worked on.
I will save a look at the other furniture pieces until my next post which will show the progression of the quilt shop itself. I hope you like the progress so far. TTFN!! - Marilyn
When these blooms start to fade, our lilacs will just be coming into bloom. They will be followed by the peonies which will be followed by everything else - white coneflower, delphinium, pink tickseed, deep purple campanula,and whatever annuals we can get our hands on including the geraniums (pelargoniums) we overwintered in our basement windows. So much to look forward to!!
As for my mini work, on May 4th, I decided I should do something special for my sister's birthday that was coming up on the 17th. Not that it was a special birthday, just because she's a special sister (although at our ages, every birthday should be celebrated!). She has always been interested in my fascination with miniatures, though not enough to try any herself. Instead, her creative outlet is quilting - and she does some truly amazing work. So, to celebrate both her birthday and her talent, I wanted to make her a quilt shop - and I had just under 2 weeks to complete it!
Now, I want to say right up front, this is not an original design of mine. Several years ago I fell in love with a shop made by Casey Rice of Casey's Minis. She called her little shop "The Rusty Needle" and you can find it by looking through her list of labels. Casey was kind enough to share with me the basic dimensions of the box itself so I figured out windows, doors, etc. from there and, from 1/4" MDF, cut out two kits that I could use to make whatever kind of shop I wanted. Did I mention I cut those out in 2016?? Bottom line - I had a room box kit cut out and ready to go which was a big help.
I don't have pictures of the pieces but I glued together the front, back and 2 sides using Quick Grip glue then set the box on the floor and traced around the inside so I could determine where the inside floor would be. It should be noted that mine is a mirror image of Casey's - not for any creative reason, but simply because I'm lazy. The door I had for the front was hinged on the wrong side and I was too lazy to take it apart and re-hinge it. Hence the mirror image. *smile*
Then I painted the inside walls "leprechaun green" and I used Popsicle sticks and tongue depressors for the floor. I quite liked the pattern of two rows of Popsicle sticks, one of tongue depressors. The narrow and wide planks together turned out well. I sanded them, stained them and put on three coats of matte-finish urethane. The picture below is before the coats of urethane.
At this point I will temporarily step away from the building itself and talk about all the things I needed to put in a quilt shop. First - furniture. I found these three pieces in my stash. The large piece will be used for fabric bolts. I took out the bottom centre shelf because I wanted some bolts to stand upright and the shelves were too close together. Then I found an old Michael's hutch that had two doors in its upper portion - which I removed. This would hold a finished quilt and whatever else I could come up with. I also had an old House of Miniatures kit for a bookshelf that was meant to sit on top of a drop-down desk. Here it will be hung on the wall to hold crochet thread, ribbons, and who-knows-whats.
Now, I needed a table to hold the cash register. I was just about to make one when I spotted this buffet and hutch in my furniture stash.
I can't remember where I picked up this piece but I never used it because it always seemed a little "clunky" to me. I think it was the mullions in the doors that threw me off for the most part. They seemed way too thick to be in this size door. So, if I cut the top off, and sanded and sanded and sanded the top of the bottom half to remove the glue, I could stain its top and use it for the cash table.
So now I had all the furniture painted with a few coats of white. Oh yes, I also found a small table to which I added braces between the legs and glued in a bottom shelf. And you can just see the top of a little white pressed-back chair sitting in the middle. I also gathered up already made bolts of fabric - some I bought, some were made for me by my friend Louise, and a stack of fabric scraps I had wheedled out of my sister without her knowing exactly what I wanted them for. I cut 3/4" wide strips of mat board which I then painted white on the coloured side, and cut into 2" lengths for the bolts. Then I was off to the races.
In the tall buffet cabinet I folded up a "quilt" - actually a piece of pre-quilted fabric in a tiny floral pattern, a couple of cushions, two bolts of patterned flannelette suitable for a nursery quilt, a collection of sewing patterns and a couple of quilting books.
Speaking of quilting books - here are the 8 book covers I made, then used mat board to wrap them around to look like books.
Here's a picture of the smaller wall cabinet, mostly filled. In the top shelf is an actual mini quilt, folded. I made the balls of crochet cotton by wrapping 3 strands of embroidery floss around pony beads. I also made a wall holder for DMC floss. Agghhhhh - I don't know that I will ever make skeins of floss again!!
Here is my first try at floss skeins. I used a couple of posts in my wire-bending jig. Nu-uh!! DID NOT WORK FOR ME!! After several failed attempts I put two layers of black foamboard together and stuck two tapestry needles 1/2" apart. I taped down one end of the floss, wrapped around the needles 7 or 8 times, slid little pieces of paper underneath and wrapped it around and glued before cutting off the ends of the floss. I started getting a little better with the last two I made but I can't see me making a career of it!! It was truly one of the hardest teeny things I've ever worked on.
I will save a look at the other furniture pieces until my next post which will show the progression of the quilt shop itself. I hope you like the progress so far. TTFN!! - Marilyn
Subscribe to:
Posts (Atom)

