This is a very short post this week as I have been busy with a lot of rel-life things - mostly working on database entries for the Irish Association as we are in the middle of developing a new web site. As a result - I have not had much time for minis this week *insert large sad face here!*
Since I wasn't able to work on the North Pole Post Office this week, I thought I would post some pictures of the hydrangea tree from Dorothy's Corner. YES!! I have actually finished it and "planted" it in place.
Here is a picture of a real Pink Diamond hydrangea:
Here is my final version in place:
Suffice to say - I am so glad I had only 29 branches and buds to apply florets and leaves to instead of the number of branches on a real tree! I couldn't possibly live long enough to complete that!
I planted the tree behind the fence so that it can hang over the garden on the other side. Also, the pink of the flower heads is almost exactly the same colour as the pink of the bird house on the wall above it.
If you look closely enough you can see the little blue tit perched on the top rail of the fence, under the tree. Also, Dorothy has been a little remiss in her gardening as she has missed a few dandelions growing at the base of the tree. I guess it's a matter of "out of sight, out of mind". I can understand that!
Sorry for the brevity of this week's post but the good news is - you won't have to see any more entries about Dorothy's Corner!! I do hope I will have some time to spend on the Post Office this week coming up so I can share some updated pictures of its progress next Tuesday. Until then, I hope you all have a great week working on your own minis and are keeping safe and healthy.. Big hugs! TTFN!!! - Marilyn D.
Showing posts with label Dorothy's Corner. Show all posts
Tuesday, 21 July 2020
Tuesday, 2 June 2020
Quilty Pleasures - Take II
Now that my sister has her gift (her birthday was on the 17th) it's time to reveal the building in its entirety.
At the beginning of the last post I showed you the building "in the raw". I cut the pieces from 1/4" MDF, which is what I use for most of my buildings, and used Quick Grip to glue it together. You saw the wood floor in the last post and the "leprechaun green" I painted the interior walls. I used a textured brick paper for the exterior. I was struggling over what to use as decorative brackets around the roof line when my DH suggested he had some leftover life size baseboard molding. He sliced off the top, flat part of the molding, then sliced 1/4" slices for the long brackets. He then made the smaller brackets from 1/4" slices from just the very end of the trim. I think they look great and will be using these type of brackets again in the future, for sure.
I still had to install the "windows" and trim them out, as well as a decorative trim around the top of the roof line and along the bottom of the window frame. I decided on a 3-layer trim of dentil molding, 1/4" stock lumber and small quarter round, painting them in Wedgewood green and Burnt cherry. I was more than satisfied with how they turned out. Here you can also see the detail of those brackets my dear hubbie, Bruce, made for me.
I glued the plastic pieces onto the window frames then painted some mini baseboard in Wedgewood green to trim them. In this picture you see I have painted and installed the front and back doors as well.
I added the dentil molding combo to the bottom of the window too. Here you can see all of the window molding - - and the fact that I was starting to try out furniture inside the store.
So, I guess its time to show it all together! First, I do want to point out the street signs on the front and side of the building. Quilty Pleasures is located on the corner of C.V. Gay Blvd. and E. Martin Lane. Those happen to be the names of our late parents and I thought my sister would appreciate her gift even more with this little addition.
I made the sign using MSPowerpoint. I used a font called "Algerian" and made sure the text box was set at "no fill" so that I could place another box behind the words. I did a search for quilting stitch patterns and decided on this one which I set as a green colour and placed it behind the text box in PowerPoint. When I had it the size I wanted I printed it out, mounted it onto a piece of wood, coated it with mod podge and framed it with a burnt cherry colour wood.
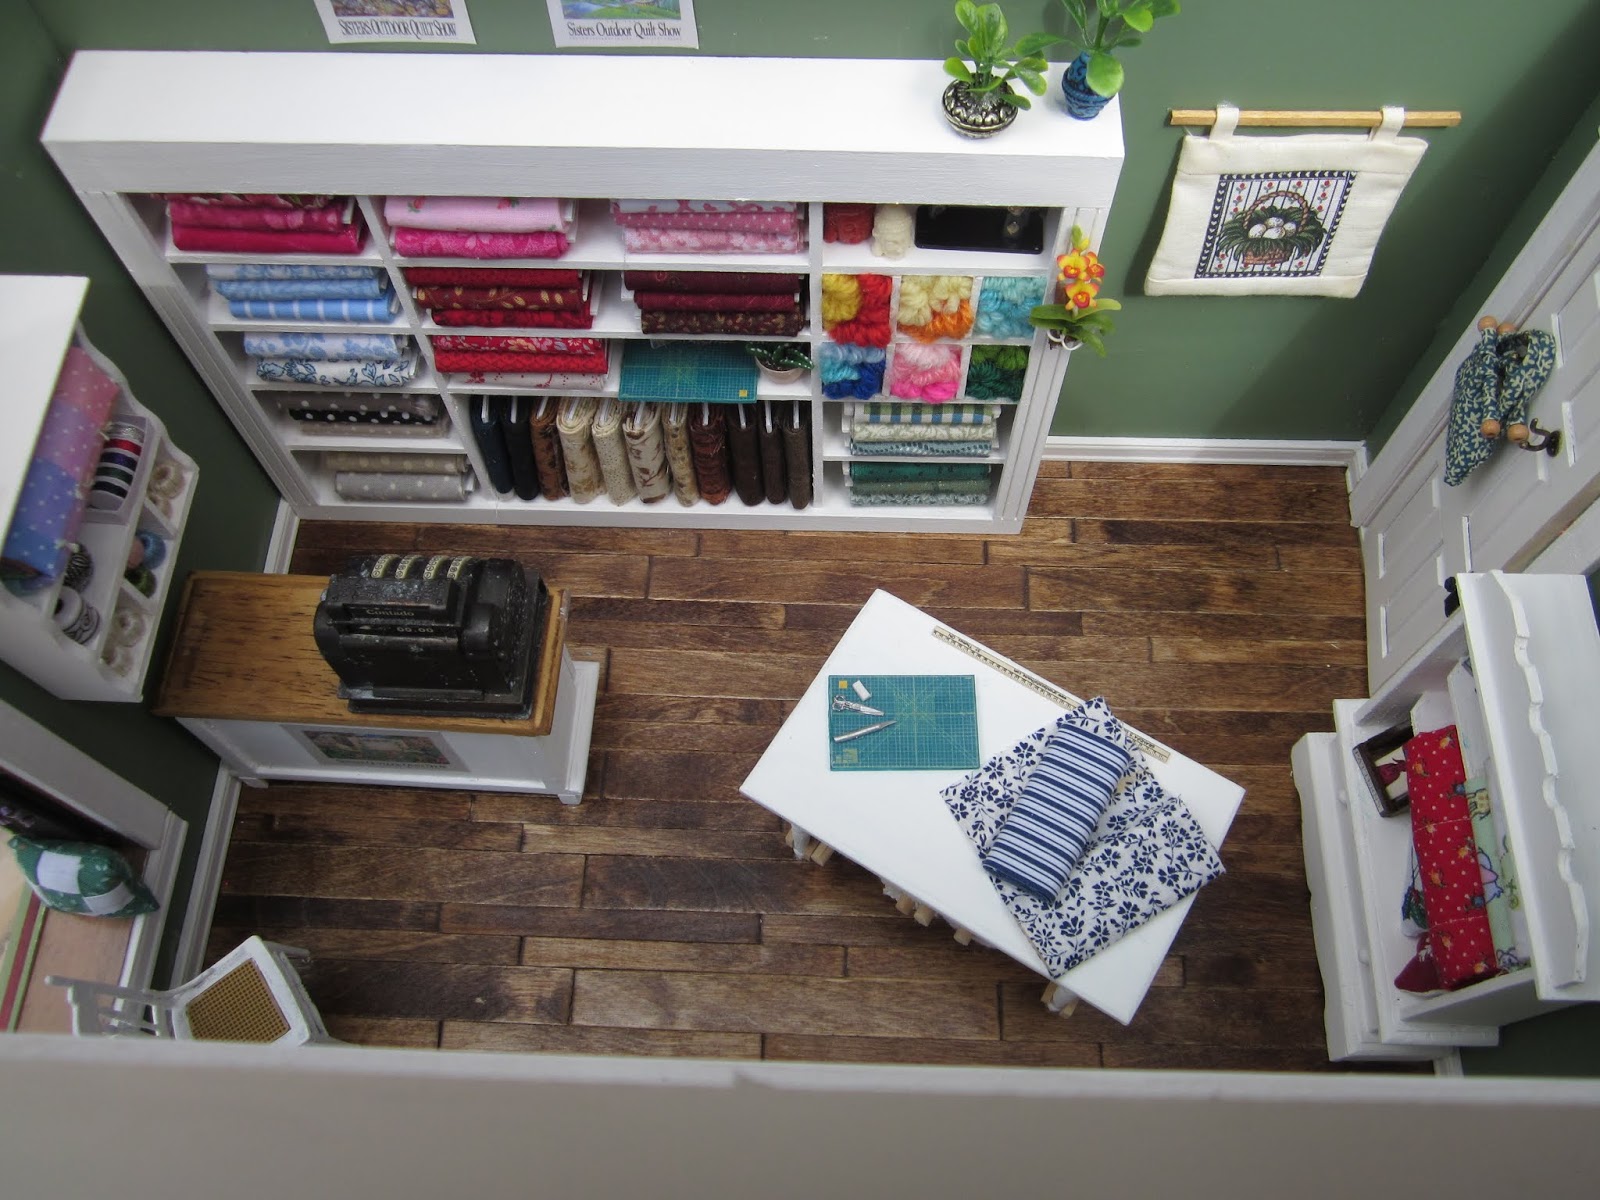
So, do you feel like shopping? Come on in! As you enter you can see the cutting table, complete with a measuring tape attached to the table and, behind this, you'll find cubbies with a variety of colours of yarn for those who might like to knit, crochet, or maybe use the yarn for a simple tied quilt.
An overview of the shop let's you take everything in at once. I see the shop owner has left her bag hanging on the hook on the back door. She is also obviously a plant lover. There are orchids, a caladium and several green plants dotted around the shop. See if you can spot them all as you walk through.
On the cutting table someone has left two nicely coordinated fabrics, ready to be cut. There is a small cutting mat sitting on the corner (and another one on one of the shelves behind in case a customer is looking to buy one). Under the cutting table there is quilt batting, lining, and wool batting on large rolls, readily available for the local quilters.
There are quilt books on the window seat and a few more in the shelves of the cabinets. Speaking of the window seat, the wood grain look on the seat and up the walls of the window bump out, is actually strips cut from the sample cards for formica counter tops that you find at your local building supply store. The cards are quite large, about 3 or 4 inches by approximately 8", which gives lots of possible uses! I also want to point out that I found online, a variety of posters for what apparently used to be an annual quilt show in the USA called the "Sisters' Outdoor Quilt Show". How perfect is that for a gift for my sister?!? I put one on the front of the cash table and two others above the fabric bolt cabinet.
Finally, these are the last few pictures I took before delivering it to my sister on her birthday. There are spools of crochet cotton in the wall shelf and a box of ribbons, a quilt for sale, and a couple of decorative pots. More than half of the fabric bolts were made using fabric from my sister, so every time she looks at them she can remember each quilt she has made with those fabrics. I'm happy to say, she seemed really thrilled with it.
Thus ends the saga of Quilty Pleasures - happily delivered to its "forever home".
But - talking about a saga - remember Dorothy's Corner?? I still had to finish the hydrangea tree for the back of the garden before I could call it complete. Well, my mini friends and I have been meeting through Skype on Wednesday and Friday afternoons to work on our minis together (virtually). I made the decision that on Fridays I would only work on something from previous projects I have not yet completed. We've dubbed it "Finish Friday". I have been working on the tree on Fridays and on whatever my current project is on any other day of the week I want. I have finally gotten all of the buds covered in tiny little white blossoms.
Each of the 29 buds required between 80 and 90 tiny flowers that each had to be shaped before applying. That was a lot of Fridays!! In the end, the hydrangea tree I was going for is a peegee hydrangea called Pink Diamond. So I then made a very watery mixture using a craft acrylic paint in "old rose". By making it really thin I was able to basically touch my brush to the wide end of the blossom and let it seep into the rest of it. I think it looks way more realistic than if I had used a solid pink paper to cut the teeny flowers. You can see the details better in this picture, and any of the others, if you click on the picture to enlarge it.
Now I just have to add the leaves. I think it will take only 8 leaves per branch instead of the 80 or 90 tiny blossoms so it will take far fewer Fridays to actually finish this! Thank heavens for small mercies!
To close, I wanted to leave you with this picture of Dorothy's Corner. It is sitting on a corner of a cabinet and, when my husband was trimming the rhododendron earlier this season, he took one of the branches and placed it in water to see what would happen. The buds were still tightly closed and showed no colour at all. A week later it was in full bloom and hanging over Dorothy's Garden. No way I can duplicate that!
Until my next post a week from today, keep safe, keep healthy, and keep on mini-ing! TTFN!! - Marilyn D.
At the beginning of the last post I showed you the building "in the raw". I cut the pieces from 1/4" MDF, which is what I use for most of my buildings, and used Quick Grip to glue it together. You saw the wood floor in the last post and the "leprechaun green" I painted the interior walls. I used a textured brick paper for the exterior. I was struggling over what to use as decorative brackets around the roof line when my DH suggested he had some leftover life size baseboard molding. He sliced off the top, flat part of the molding, then sliced 1/4" slices for the long brackets. He then made the smaller brackets from 1/4" slices from just the very end of the trim. I think they look great and will be using these type of brackets again in the future, for sure.
I still had to install the "windows" and trim them out, as well as a decorative trim around the top of the roof line and along the bottom of the window frame. I decided on a 3-layer trim of dentil molding, 1/4" stock lumber and small quarter round, painting them in Wedgewood green and Burnt cherry. I was more than satisfied with how they turned out. Here you can also see the detail of those brackets my dear hubbie, Bruce, made for me.
I glued the plastic pieces onto the window frames then painted some mini baseboard in Wedgewood green to trim them. In this picture you see I have painted and installed the front and back doors as well.
I added the dentil molding combo to the bottom of the window too. Here you can see all of the window molding - - and the fact that I was starting to try out furniture inside the store.
So, I guess its time to show it all together! First, I do want to point out the street signs on the front and side of the building. Quilty Pleasures is located on the corner of C.V. Gay Blvd. and E. Martin Lane. Those happen to be the names of our late parents and I thought my sister would appreciate her gift even more with this little addition.
I made the sign using MSPowerpoint. I used a font called "Algerian" and made sure the text box was set at "no fill" so that I could place another box behind the words. I did a search for quilting stitch patterns and decided on this one which I set as a green colour and placed it behind the text box in PowerPoint. When I had it the size I wanted I printed it out, mounted it onto a piece of wood, coated it with mod podge and framed it with a burnt cherry colour wood.
So, do you feel like shopping? Come on in! As you enter you can see the cutting table, complete with a measuring tape attached to the table and, behind this, you'll find cubbies with a variety of colours of yarn for those who might like to knit, crochet, or maybe use the yarn for a simple tied quilt.
An overview of the shop let's you take everything in at once. I see the shop owner has left her bag hanging on the hook on the back door. She is also obviously a plant lover. There are orchids, a caladium and several green plants dotted around the shop. See if you can spot them all as you walk through.
On the cutting table someone has left two nicely coordinated fabrics, ready to be cut. There is a small cutting mat sitting on the corner (and another one on one of the shelves behind in case a customer is looking to buy one). Under the cutting table there is quilt batting, lining, and wool batting on large rolls, readily available for the local quilters.
There are quilt books on the window seat and a few more in the shelves of the cabinets. Speaking of the window seat, the wood grain look on the seat and up the walls of the window bump out, is actually strips cut from the sample cards for formica counter tops that you find at your local building supply store. The cards are quite large, about 3 or 4 inches by approximately 8", which gives lots of possible uses! I also want to point out that I found online, a variety of posters for what apparently used to be an annual quilt show in the USA called the "Sisters' Outdoor Quilt Show". How perfect is that for a gift for my sister?!? I put one on the front of the cash table and two others above the fabric bolt cabinet.
Finally, these are the last few pictures I took before delivering it to my sister on her birthday. There are spools of crochet cotton in the wall shelf and a box of ribbons, a quilt for sale, and a couple of decorative pots. More than half of the fabric bolts were made using fabric from my sister, so every time she looks at them she can remember each quilt she has made with those fabrics. I'm happy to say, she seemed really thrilled with it.
Thus ends the saga of Quilty Pleasures - happily delivered to its "forever home".
But - talking about a saga - remember Dorothy's Corner?? I still had to finish the hydrangea tree for the back of the garden before I could call it complete. Well, my mini friends and I have been meeting through Skype on Wednesday and Friday afternoons to work on our minis together (virtually). I made the decision that on Fridays I would only work on something from previous projects I have not yet completed. We've dubbed it "Finish Friday". I have been working on the tree on Fridays and on whatever my current project is on any other day of the week I want. I have finally gotten all of the buds covered in tiny little white blossoms.
Each of the 29 buds required between 80 and 90 tiny flowers that each had to be shaped before applying. That was a lot of Fridays!! In the end, the hydrangea tree I was going for is a peegee hydrangea called Pink Diamond. So I then made a very watery mixture using a craft acrylic paint in "old rose". By making it really thin I was able to basically touch my brush to the wide end of the blossom and let it seep into the rest of it. I think it looks way more realistic than if I had used a solid pink paper to cut the teeny flowers. You can see the details better in this picture, and any of the others, if you click on the picture to enlarge it.
Now I just have to add the leaves. I think it will take only 8 leaves per branch instead of the 80 or 90 tiny blossoms so it will take far fewer Fridays to actually finish this! Thank heavens for small mercies!
To close, I wanted to leave you with this picture of Dorothy's Corner. It is sitting on a corner of a cabinet and, when my husband was trimming the rhododendron earlier this season, he took one of the branches and placed it in water to see what would happen. The buds were still tightly closed and showed no colour at all. A week later it was in full bloom and hanging over Dorothy's Garden. No way I can duplicate that!
Until my next post a week from today, keep safe, keep healthy, and keep on mini-ing! TTFN!! - Marilyn D.
Friday, 21 February 2020
Time to put my big girl panties on....
...and finish what I started!!!
And, oh, that list is long. With the limited time I have to work on minis, and the fact that I am so easily distracted, I took the time this week to step back and come up with a plan, which should last at least as long as it takes before another squirrel runs into my sight-line or a butterfly flits past me. But, I promise - I will try.
I am desperately wanting to start work on my "North Pole Postal Service" project that I have been thinking of for a few years now but I have made a decision - I cannot start a new project until I clear up the many I have partially completed. Whenever I start a new project I go full tilt for a short while then something else take my attention and I'm off. This has got to stop!
So - I am going to work my way backwards and finish some things. But, of course, I know I will need to take short detours throughout so I can keep my enthusiasm up.
I will be concentrating on two of my old projects for the time being and insert some little real-life inspired minis in between. The two last projects I had started and not finished are up first:
Dorothy's Corner: Hopefully you remember this little project from last spring. I named it Dorothy's Corner after the poet, Dorothy Frances Gurney, whose poem "God's Garden" is the source of the lines seen on many garden signs and plaques "...One is nearer God's heart in a garden, than any place else on earth..." I even placed a copy of her poem on the arm of the garden chair and the famous lines in a wall plaque above the bird bath.
Well, here it still sits, almost fully complete. Almost is the operative word here. So, to finish this project here is what I will be reporting progress on until it is done:
1. fill the bottom of the hanging basket with moss so the fern isn't "floating" in the basket (easy peasey)
2. paint the handle of the faucet a brighter colour so it doesn't blend into the wall (super easy peasey)
3. add water to the bucket and water and birds to the bird bath (takes a little longer because I will have to make the birds, paint the birds; mix the resin for the water, wipe up the spilled resin...you know how it goes)
4. FINISH the d**n hydrangea tree!!! Honestly, I don't mind doing it, it just takes so long for each flower head, then I will have to paint the flower heads, cut and glue on all the leaves, "plant" it in place.. (not so easy peasey - okay, easy but time consuming) Here is the spot where the tree will go and below that is the tree in place with more than half of the flower heads done (the pink cones are the base to which I am gluing 70 to 80 tiny white flower cut outs for each bud).
I will let you know how it goes.
The second project I have chosen to concentrate on is the "kitchen n a cupboard" from last year's Camp Mini Ha Ha. I have lots to do to finish that one before Camp rolls around again in September. I have the main body done (in the picture below it doesn't show the decorative stained top and bottom of the cabinet). I have 2 coats of paint on the cupboards for the inside but I now think I will remove the bottom right cupboard and the slider next to it and replace them with a little stove and cook top. I am planning on putting the cupboard on a base and turning the whole little scene into a shop that makes and sells honey products. In keeping with the honeybee theme, I am toying with what I will name it. I had thought perhaps I would call it "The Honey Pot" but my mini friends loudly nixed that idea - I wonder why???? So - maybe "The Bees' Knees"??? Anyone got any ideas??
For this project then, I have to:
1. finish the honeycomb floor (easy peasey - only the edges left to make)
2. remove the cupboard and build in a stove instead (getting harder)
3. Install all cupboards
4. finish running wiring for the lights in the cupboards
5. install counter top and backsplash
6. install faucets
7. Make all of the honey products that the shop will be selling
8. make shelves and accessories
Okay, a much longer list with this one but I am determined! Again, I will keep you updated.
And finally, to keep my mini spirits up - I am pining for spring in this frozen tundra known as the Atlantic coast of Canada so I have been looking at all kinds of spring decor items (real life size) to decorate my real house with. I may just pick one from time to time and miniaturize it to make me feel closer to the day when the warm spring air starts flowing again.
Until next Friday - when I will be posting from the Southern coast of Ireland - have a great week! TTFN! - Marilyn
And, oh, that list is long. With the limited time I have to work on minis, and the fact that I am so easily distracted, I took the time this week to step back and come up with a plan, which should last at least as long as it takes before another squirrel runs into my sight-line or a butterfly flits past me. But, I promise - I will try.
I am desperately wanting to start work on my "North Pole Postal Service" project that I have been thinking of for a few years now but I have made a decision - I cannot start a new project until I clear up the many I have partially completed. Whenever I start a new project I go full tilt for a short while then something else take my attention and I'm off. This has got to stop!
So - I am going to work my way backwards and finish some things. But, of course, I know I will need to take short detours throughout so I can keep my enthusiasm up.
I will be concentrating on two of my old projects for the time being and insert some little real-life inspired minis in between. The two last projects I had started and not finished are up first:
Dorothy's Corner: Hopefully you remember this little project from last spring. I named it Dorothy's Corner after the poet, Dorothy Frances Gurney, whose poem "God's Garden" is the source of the lines seen on many garden signs and plaques "...One is nearer God's heart in a garden, than any place else on earth..." I even placed a copy of her poem on the arm of the garden chair and the famous lines in a wall plaque above the bird bath.
Well, here it still sits, almost fully complete. Almost is the operative word here. So, to finish this project here is what I will be reporting progress on until it is done:
1. fill the bottom of the hanging basket with moss so the fern isn't "floating" in the basket (easy peasey)
2. paint the handle of the faucet a brighter colour so it doesn't blend into the wall (super easy peasey)
3. add water to the bucket and water and birds to the bird bath (takes a little longer because I will have to make the birds, paint the birds; mix the resin for the water, wipe up the spilled resin...you know how it goes)
4. FINISH the d**n hydrangea tree!!! Honestly, I don't mind doing it, it just takes so long for each flower head, then I will have to paint the flower heads, cut and glue on all the leaves, "plant" it in place.. (not so easy peasey - okay, easy but time consuming) Here is the spot where the tree will go and below that is the tree in place with more than half of the flower heads done (the pink cones are the base to which I am gluing 70 to 80 tiny white flower cut outs for each bud).
I will let you know how it goes.
The second project I have chosen to concentrate on is the "kitchen n a cupboard" from last year's Camp Mini Ha Ha. I have lots to do to finish that one before Camp rolls around again in September. I have the main body done (in the picture below it doesn't show the decorative stained top and bottom of the cabinet). I have 2 coats of paint on the cupboards for the inside but I now think I will remove the bottom right cupboard and the slider next to it and replace them with a little stove and cook top. I am planning on putting the cupboard on a base and turning the whole little scene into a shop that makes and sells honey products. In keeping with the honeybee theme, I am toying with what I will name it. I had thought perhaps I would call it "The Honey Pot" but my mini friends loudly nixed that idea - I wonder why???? So - maybe "The Bees' Knees"??? Anyone got any ideas??
For this project then, I have to:
1. finish the honeycomb floor (easy peasey - only the edges left to make)
2. remove the cupboard and build in a stove instead (getting harder)
3. Install all cupboards
4. finish running wiring for the lights in the cupboards
5. install counter top and backsplash
6. install faucets
7. Make all of the honey products that the shop will be selling
8. make shelves and accessories
Okay, a much longer list with this one but I am determined! Again, I will keep you updated.
And finally, to keep my mini spirits up - I am pining for spring in this frozen tundra known as the Atlantic coast of Canada so I have been looking at all kinds of spring decor items (real life size) to decorate my real house with. I may just pick one from time to time and miniaturize it to make me feel closer to the day when the warm spring air starts flowing again.
Until next Friday - when I will be posting from the Southern coast of Ireland - have a great week! TTFN! - Marilyn
Wednesday, 15 May 2019
And the winner is......
...to be revealed momentarily. First thing to do is to reveal the answer to the mystery - why was my project titled "Dorothy's corner? There were two small hints in the project itself:
1. on the arm of the chair is a little book titled "God's Garden" by D.F. Gurney
2. on the wall over the bird bath is a garden plaque with a stanza from the poem in this book. The stanza is seen on many a garden sign in many gardens. It is from a larger poem (see number 1 above). These lines say:
The kiss of the sun for pardon,
the song of the birds for mirth
one is nearer God's heart in a garden
than anywhere else on earth.
You can read the full poem by looking it up under the name DOROTHY Frances Gurney. That is why it is called Dorothy's Corner. Sorry I made it too difficult to solve. (insert sad face here!!) Next time I run a contest I will go easier on you, I promise!
Now, since no one guessed the answer to the mystery, the name drawn randomly will actually win 2 hostas, 2 dwarf astilbes, a copy of the little book in Dorothy's Corner, "God's Garden", a garden lantern, and a glass of refreshing water with lemon (or you could say it is gin and tonic instead!) *smile*.
And the winner is......
CARRIE
Congratulations, Carrie. Please use my email address under my profile to mail me your snail mail address so I can get your prizes to you. And thank you to everyone who takes the time to encourage myself and other bloggers each time you leave a comment on our blog posts. Love ya all!!
TTFN!! - Marilyn
1. on the arm of the chair is a little book titled "God's Garden" by D.F. Gurney
2. on the wall over the bird bath is a garden plaque with a stanza from the poem in this book. The stanza is seen on many a garden sign in many gardens. It is from a larger poem (see number 1 above). These lines say:
The kiss of the sun for pardon,
the song of the birds for mirth
one is nearer God's heart in a garden
than anywhere else on earth.
You can read the full poem by looking it up under the name DOROTHY Frances Gurney. That is why it is called Dorothy's Corner. Sorry I made it too difficult to solve. (insert sad face here!!) Next time I run a contest I will go easier on you, I promise!
Now, since no one guessed the answer to the mystery, the name drawn randomly will actually win 2 hostas, 2 dwarf astilbes, a copy of the little book in Dorothy's Corner, "God's Garden", a garden lantern, and a glass of refreshing water with lemon (or you could say it is gin and tonic instead!) *smile*.
And the winner is......
CARRIE
Congratulations, Carrie. Please use my email address under my profile to mail me your snail mail address so I can get your prizes to you. And thank you to everyone who takes the time to encourage myself and other bloggers each time you leave a comment on our blog posts. Love ya all!!
TTFN!! - Marilyn
Tuesday, 14 May 2019
Winner to be announced tomorrow morning
Thank you to all who left comments on my "Dorothy's Corner" project. It was a fun, quick little project that fed my need for something sunny and spring-like after a long, terrible winter.
Unfortunately, I was much too subtle with the hints of why it was called "Dorothy's Corner" so no one correctly guessed the answer. Right after I post this entry, I will be asking my DH to draw from the names of those who did leave wonderful comments. Although having a blog is a great way to keep track of my own projects to refer to in the future, it's always encouraging to know that by sharing my successes and failures, techniques and crazy ideas, I may actually be helping someone else with their own projects as well. I know I learn so much by reading everyone else's blog posts. I only hope I can add to the hints and tips.
So, I'm off to draw a name and will post the winner tomorrow morning, along with revealing the mystery of why it is called "Dorothy's Corner". Have a great evening. TTFN! - Marilyn
Unfortunately, I was much too subtle with the hints of why it was called "Dorothy's Corner" so no one correctly guessed the answer. Right after I post this entry, I will be asking my DH to draw from the names of those who did leave wonderful comments. Although having a blog is a great way to keep track of my own projects to refer to in the future, it's always encouraging to know that by sharing my successes and failures, techniques and crazy ideas, I may actually be helping someone else with their own projects as well. I know I learn so much by reading everyone else's blog posts. I only hope I can add to the hints and tips.
So, I'm off to draw a name and will post the winner tomorrow morning, along with revealing the mystery of why it is called "Dorothy's Corner". Have a great evening. TTFN! - Marilyn
Monday, 13 May 2019
Dorothy closing in on the finish line
Okay - our little contest ends tomorrow and Dorothy's Corner is not actually finished. *sigh* This is becoming the story of my life! However, it is finished enough for you to imagine what it will look like when it is done, and also to take another stab at guessing why it's called "Dorothy's Corner. I will tell you up front that there are two hints in these pictures now that will point you in the right direction.
I have also decided that the winners of our little contest will each receive a hosta plant, an astilbe plant, a garden lantern, book of poetry, and a glass of water with lemon (or is it a gin and tonic? Hard to say.).
So on to our latest pictures:
In our last post I said I was moving on to make a climbing rose to go over the split-rail fence. For the basic frame of the climbing rose, I found some plastic plant material in my stash that had several "branches" off to the sides. The "leaves" were almost fern-like. I left the centre vein of each leaf, cut off all the feathery "leaves", and painted the whole thing brown.
Then I found a strip of leaves I had taken from a plastic topiary I had, cut off the large and medium size leaves to save for another project, then cut off the two smallest sized leaves to use on my twining rose vine. I glued these smaller leaves onto the framework I had made, in pairs that mimic the way real rose leaves grow.
Then I "planted" the rose at the base of the fence, gently bending it over the fence and pulling one small branch through to the backside before adding flowers. I figured if I glued the flowers on first, many would fall off as I was manipulating the plant itself around the fence. I did end up having to tie off the vines in a couple of places to hold it in place better. I used brown thread so it is virtually invisible.
I wanted an "old rose" variety and I found a picture of one - actually a hand stitched embroidery - hanging on the wall of my friend, Louise's house. The lovely old rose had only two layers of petals, was pink around the outside edges, white toward the centre and had a touch of yellow in the very centre. So, I used white paper and the two smaller sizes from this punch:
I shaped the two different sizes, then glued the smaller inside the slightly larger one before painting.
It was hard to make the yellow dot in the centre to be small enough. Some worked, some didn't, but overall, I think it turned out pretty good.
Then I planted the rest of the garden. Starting of the left side we have a hosta "Great Expectations on either side of the bird bath - which was made by miniature potter Jo-Ann Shaw, then there is a white miniature astilbe followed by a blue hydrangea, white carnations, a tall blue delphinium, a purple agapanthis with a clump of silver grey wormwood in front, and a pink miniature astilbe bringing up the end.
With the garden mostly planted (I'm still not finished the beautiful hydrangea tree I have planned for behind the fence), I turned my attention to the inside of the cross-section of the garage/potting shed.
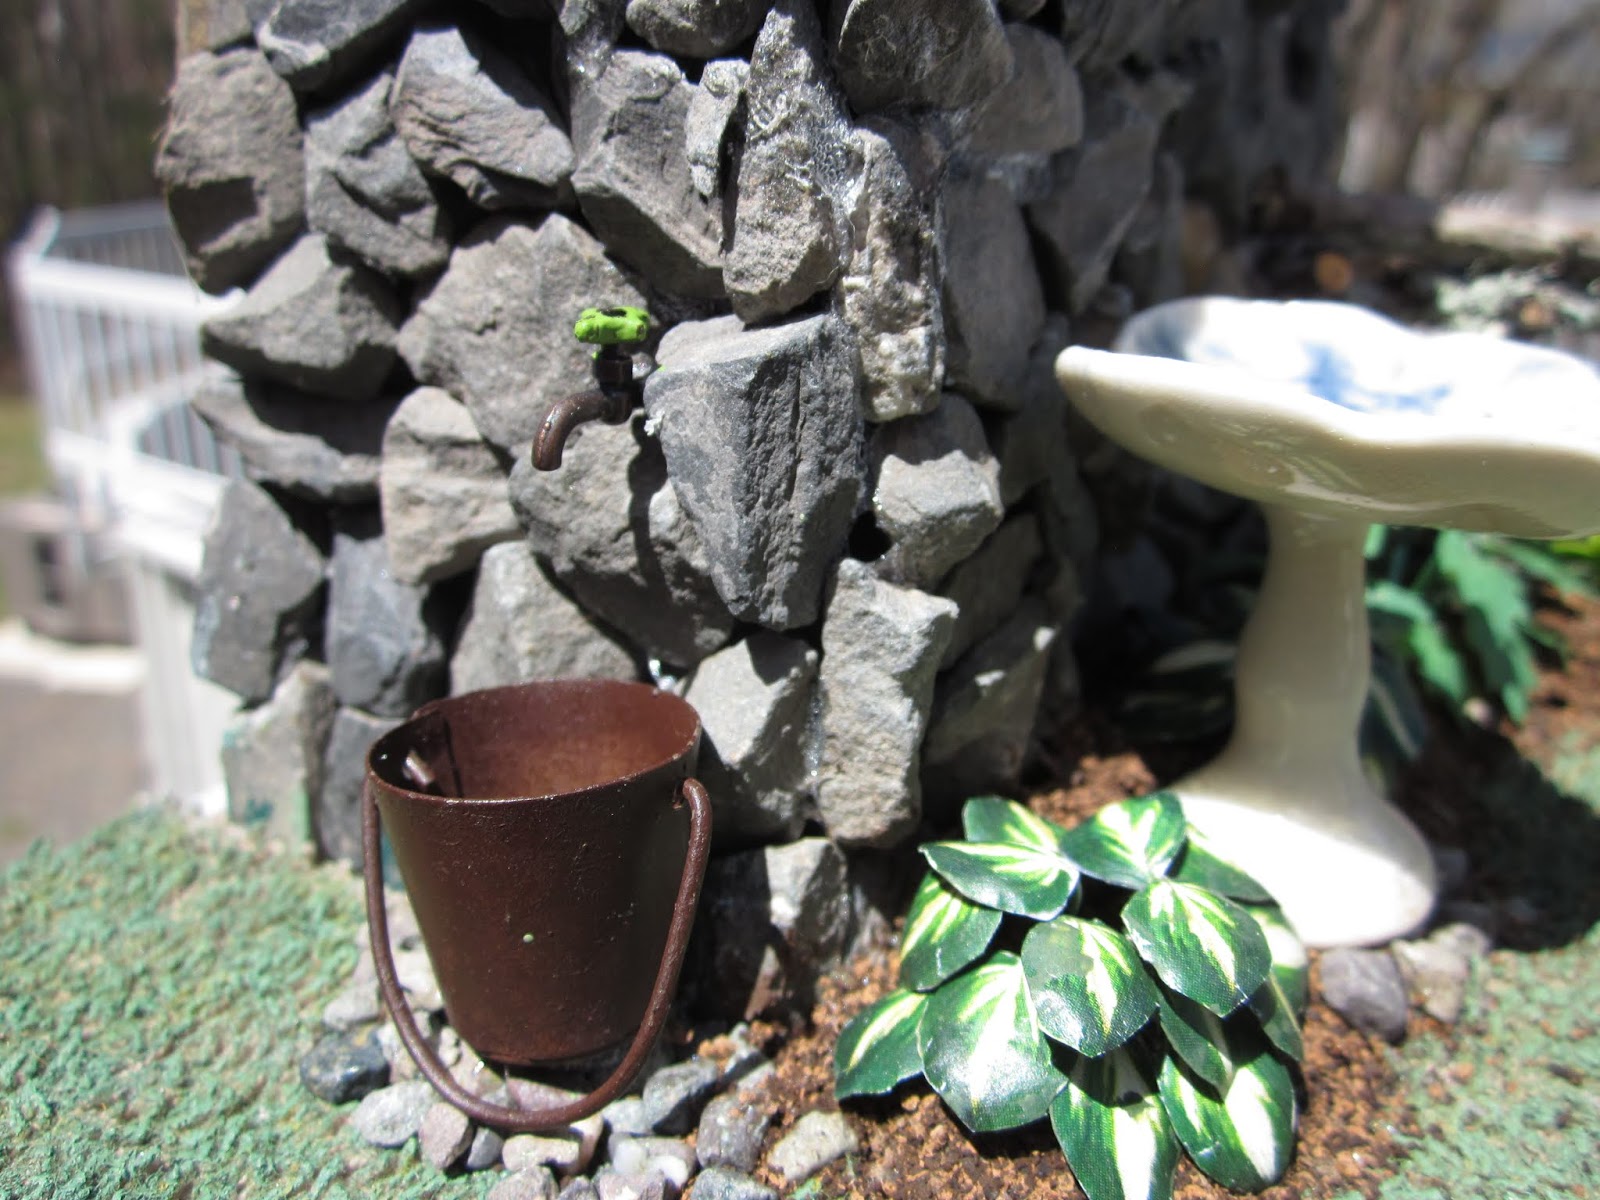
Moving around the corner from the garden to the shed, we see a garden plaque hanging above the beautiful bird bath, pass by the water bucket standing on a bed of stones under a water faucet, check out the bird in the bird house, who is checking us out at the same time, and enter the working section of the garden.
Moving into the work shed, we see that Dorothy has everything she needs in a very compact corner - from the rake and shovel hanging on the end wall, to the hand tools at her fingertips above the bench. In a hanging crate she keeps some seeds, fertilizers and supplements. For those big jobs, she keeps a regular saw handy as well.
She is getting ready to re-pot one of her African violets (made by Betty Stan), and I see some soil has fallen from the overturned pot onto the floor below. Oh, oh - that's not all that has fallen. I see a broken pot peeking out from under the potting bench. And, her new bag of potting soil obviously has a hole in the bottom corner.
Moving back around the corner to the garden again, we see Dorothy's special reading corner - with her favourite book of poetry (made by me), a cool drink to quench her thirst, and her sun hat waiting to shield her from the brightest rays while she relaxes and enjoys the results of all her hard work. The chair was made in raw wood by Wayne Dieleman. Marijke suggested I hand paint a design on the chair back. Instead, I painted it cream then found a watercolour print that I really liked online, cut it into strips to fit the slats of the chair back, and used ModPodge to seal it onto the chair. Personally, I love how it looks!
Here is the garden from Dorothy's viewpoint, without the planned hydrangea tree in place.
The tree is "under construction" but it is taking me about 35 to 45 minutes to apply the tiny flowers to each flower head. Then I have to apply the leaves. When done, it will be placed behind the fence and hang over into the garden. I think it will be a real focal point. It doesn't look like much now, but I know you all can use your imagination!
Here you also get a better view of Dorothy's chair with her poetry book waiting for her return.
So, we are saying goodbye for a while to Dorothy's Corner. There will be a few final pictures when that darn hydrangea tree is finished. Don't forget, you can always click on the picture to get a larger view. Also - this is your last chance to enter the draw for the prizes I mentioned earlier. There will be one random winner chosen from anyone who has left comments on the blog since the contest was announced. Hopefully, there will be a second winner who will be the first one to correctly guess why this project is called "Dorothy's Corner". Again - there are actually a couple of hints in the project itself. Good luck! TTFN. - Marilyn
I have also decided that the winners of our little contest will each receive a hosta plant, an astilbe plant, a garden lantern, book of poetry, and a glass of water with lemon (or is it a gin and tonic? Hard to say.).
So on to our latest pictures:
In our last post I said I was moving on to make a climbing rose to go over the split-rail fence. For the basic frame of the climbing rose, I found some plastic plant material in my stash that had several "branches" off to the sides. The "leaves" were almost fern-like. I left the centre vein of each leaf, cut off all the feathery "leaves", and painted the whole thing brown.
Then I found a strip of leaves I had taken from a plastic topiary I had, cut off the large and medium size leaves to save for another project, then cut off the two smallest sized leaves to use on my twining rose vine. I glued these smaller leaves onto the framework I had made, in pairs that mimic the way real rose leaves grow.
Then I "planted" the rose at the base of the fence, gently bending it over the fence and pulling one small branch through to the backside before adding flowers. I figured if I glued the flowers on first, many would fall off as I was manipulating the plant itself around the fence. I did end up having to tie off the vines in a couple of places to hold it in place better. I used brown thread so it is virtually invisible.
I wanted an "old rose" variety and I found a picture of one - actually a hand stitched embroidery - hanging on the wall of my friend, Louise's house. The lovely old rose had only two layers of petals, was pink around the outside edges, white toward the centre and had a touch of yellow in the very centre. So, I used white paper and the two smaller sizes from this punch:
I shaped the two different sizes, then glued the smaller inside the slightly larger one before painting.
It was hard to make the yellow dot in the centre to be small enough. Some worked, some didn't, but overall, I think it turned out pretty good.
Then I planted the rest of the garden. Starting of the left side we have a hosta "Great Expectations on either side of the bird bath - which was made by miniature potter Jo-Ann Shaw, then there is a white miniature astilbe followed by a blue hydrangea, white carnations, a tall blue delphinium, a purple agapanthis with a clump of silver grey wormwood in front, and a pink miniature astilbe bringing up the end.
With the garden mostly planted (I'm still not finished the beautiful hydrangea tree I have planned for behind the fence), I turned my attention to the inside of the cross-section of the garage/potting shed.
Moving around the corner from the garden to the shed, we see a garden plaque hanging above the beautiful bird bath, pass by the water bucket standing on a bed of stones under a water faucet, check out the bird in the bird house, who is checking us out at the same time, and enter the working section of the garden.
Moving into the work shed, we see that Dorothy has everything she needs in a very compact corner - from the rake and shovel hanging on the end wall, to the hand tools at her fingertips above the bench. In a hanging crate she keeps some seeds, fertilizers and supplements. For those big jobs, she keeps a regular saw handy as well.
She is getting ready to re-pot one of her African violets (made by Betty Stan), and I see some soil has fallen from the overturned pot onto the floor below. Oh, oh - that's not all that has fallen. I see a broken pot peeking out from under the potting bench. And, her new bag of potting soil obviously has a hole in the bottom corner.
Moving back around the corner to the garden again, we see Dorothy's special reading corner - with her favourite book of poetry (made by me), a cool drink to quench her thirst, and her sun hat waiting to shield her from the brightest rays while she relaxes and enjoys the results of all her hard work. The chair was made in raw wood by Wayne Dieleman. Marijke suggested I hand paint a design on the chair back. Instead, I painted it cream then found a watercolour print that I really liked online, cut it into strips to fit the slats of the chair back, and used ModPodge to seal it onto the chair. Personally, I love how it looks!
Here is the garden from Dorothy's viewpoint, without the planned hydrangea tree in place.
The tree is "under construction" but it is taking me about 35 to 45 minutes to apply the tiny flowers to each flower head. Then I have to apply the leaves. When done, it will be placed behind the fence and hang over into the garden. I think it will be a real focal point. It doesn't look like much now, but I know you all can use your imagination!
Here you also get a better view of Dorothy's chair with her poetry book waiting for her return.
So, we are saying goodbye for a while to Dorothy's Corner. There will be a few final pictures when that darn hydrangea tree is finished. Don't forget, you can always click on the picture to get a larger view. Also - this is your last chance to enter the draw for the prizes I mentioned earlier. There will be one random winner chosen from anyone who has left comments on the blog since the contest was announced. Hopefully, there will be a second winner who will be the first one to correctly guess why this project is called "Dorothy's Corner". Again - there are actually a couple of hints in the project itself. Good luck! TTFN. - Marilyn
Wednesday, 1 May 2019
Dorothy's Corner - still a work in progress.
For a small project, it's surprising how many details there are that need to be completed to bring Dorothy;s Corner to life! As you know, I am aiming to have it ready to display on Saturday at the Moncton show. Yes, I mean THIS Saturday!
With so much to be done and so little knowledge of how to do any of it, I decided to revert to my absolute favourite work method. It goes by a few different names: the "wing it" method, the "just go for it" method or, my personal favourite, the "fly by the seat of your pants" method.
This method is guided by a collection of pithy sayings that are meant to inspire you to leave the worry behind and just carry on with it - sayings like:
Think of it like driving at night - you can only see as far as your headlights show you, but if you keep following them, you eventually arrive where you want to be.
Or -put very simply, you have three choices: Give in, give up, or give it everything you've got. So - I choose the last one! Here I go, one step at a time, hoping I arrive where I planned to go without too many detours and absolutely no fatal accidents!
When I left you last, the flower bed was built and the lawn was laid. It was time to move on to the actual planting. This is the step I was (and still am, truth be told) a little afraid of since I am only learning how to make a variety of plants. This is where my "fly by the seat of my pants method" will come in very handy!
The first thing I did was to cover the brown-painted floral foam flower beds with a mixture of dried coffee grounds and tea grounds. I like to use the two together for a more realistic "soil" look. I make sure they are completely dry before I use them in a project.
Then I started making leaves. The hosta leaves are from a file I downloaded from Anna Christensen's old site. This plant is "Hosta Great Expectations".
I also put stems of astilbe leaves together - they are not exactly what astilbe leaves look like in real life but I was going for the illusion, not necessarily an exact copy. A while ago my friend Marijke, from Pulchinella's Cellar, had given me a strip of leaves that could be used for a variety of purposes. I removed several from the strip and glued them to floral wire with the wire tips bent over at the end to support the leaves. You can see there are two different colours. I will use the lighter green leaves for a white astilbe and the darker green for a deep pink astilbe.
I see I had two hosta leaves left over and still stuck in the floral foam for safe keeping. *smile*
Once I had these leaves done, I glued in the bird bath, "planted" a hosta plant on either side of the bird bath, and glued in a rusty bucket sitting on some rocks around the corner, underneath an old faucet coming out from the wall. I think I will paint the handle of the faucet either red, or a bright green - just so it is a little more noticeable.
Next, I wanted to plant a white astilbe in the corner on this side (the shady side) of the garden. How was I going to make the astilbe blossoms??? I didn't have any of that "flower soft" stuff I've heard about, but never owned. Also, I felt that the flower stems should be a little thicker than the 26 gauge green floral wire I used for the leaves. I had some white paper covered floral wire so I paint a couple of lengths green, cut it into stems and, using my tried and true method (FBTSOMP method), I grabbed some dark green shredded material used by model railroaders and pulled it apart into even smaller pieces. I used Tacky Glue on the end of the stems and, using tweezers to add a little at a time, I built up the flower heads. Then I left them to dry overnight before painting them.
After the paint was dry it was time to plant the white one. This is when I discovered that the Tacky glue worked for a while but each leaf I picked up immediately came off the wire with only a gentle touch. So, going back to the FBTSOMP method, I reglued all of the leaves using Quick Grip instead then had to wait for those to set up *sigh*. Finally, I was ready to go and I planted the white astilbe in the corner where the fence meets the wall. Eventually, the hydrangea tree will hang over the fence in this area as well.
Once this was done, I used some air dry clay to make cone shapes to glue on to the end of each branch of the hydrangea tree. This will be a "Pink Diamond Pee Gee Hydrangea" which is known for its very large flower heads. Next step for this tree is to add the tiny florets all over the cones and paint them accordingly. Then I will fill all the branches with leaves.
There is still a lot to do before Saturday so tomorrow and Friday I will be working non-stop. I do not plan on having everything done by Saturday but at least enough to allow it to be displayed. After that, I will keep adding details until I am completely satisfied with it.
Coming up tomorrow - making a climbing rose for over the fence and adding more flowers to the garden. Friday will be for working on the inside of the shed. I'll be sure to update you after the Moncton show is over. Have a great night! TTFN!! - Marilyn
With so much to be done and so little knowledge of how to do any of it, I decided to revert to my absolute favourite work method. It goes by a few different names: the "wing it" method, the "just go for it" method or, my personal favourite, the "fly by the seat of your pants" method.
This method is guided by a collection of pithy sayings that are meant to inspire you to leave the worry behind and just carry on with it - sayings like:
Think of it like driving at night - you can only see as far as your headlights show you, but if you keep following them, you eventually arrive where you want to be.
Or -put very simply, you have three choices: Give in, give up, or give it everything you've got. So - I choose the last one! Here I go, one step at a time, hoping I arrive where I planned to go without too many detours and absolutely no fatal accidents!
When I left you last, the flower bed was built and the lawn was laid. It was time to move on to the actual planting. This is the step I was (and still am, truth be told) a little afraid of since I am only learning how to make a variety of plants. This is where my "fly by the seat of my pants method" will come in very handy!
The first thing I did was to cover the brown-painted floral foam flower beds with a mixture of dried coffee grounds and tea grounds. I like to use the two together for a more realistic "soil" look. I make sure they are completely dry before I use them in a project.
Then I started making leaves. The hosta leaves are from a file I downloaded from Anna Christensen's old site. This plant is "Hosta Great Expectations".
I also put stems of astilbe leaves together - they are not exactly what astilbe leaves look like in real life but I was going for the illusion, not necessarily an exact copy. A while ago my friend Marijke, from Pulchinella's Cellar, had given me a strip of leaves that could be used for a variety of purposes. I removed several from the strip and glued them to floral wire with the wire tips bent over at the end to support the leaves. You can see there are two different colours. I will use the lighter green leaves for a white astilbe and the darker green for a deep pink astilbe.
I see I had two hosta leaves left over and still stuck in the floral foam for safe keeping. *smile*
Once I had these leaves done, I glued in the bird bath, "planted" a hosta plant on either side of the bird bath, and glued in a rusty bucket sitting on some rocks around the corner, underneath an old faucet coming out from the wall. I think I will paint the handle of the faucet either red, or a bright green - just so it is a little more noticeable.
Next, I wanted to plant a white astilbe in the corner on this side (the shady side) of the garden. How was I going to make the astilbe blossoms??? I didn't have any of that "flower soft" stuff I've heard about, but never owned. Also, I felt that the flower stems should be a little thicker than the 26 gauge green floral wire I used for the leaves. I had some white paper covered floral wire so I paint a couple of lengths green, cut it into stems and, using my tried and true method (FBTSOMP method), I grabbed some dark green shredded material used by model railroaders and pulled it apart into even smaller pieces. I used Tacky Glue on the end of the stems and, using tweezers to add a little at a time, I built up the flower heads. Then I left them to dry overnight before painting them.
After the paint was dry it was time to plant the white one. This is when I discovered that the Tacky glue worked for a while but each leaf I picked up immediately came off the wire with only a gentle touch. So, going back to the FBTSOMP method, I reglued all of the leaves using Quick Grip instead then had to wait for those to set up *sigh*. Finally, I was ready to go and I planted the white astilbe in the corner where the fence meets the wall. Eventually, the hydrangea tree will hang over the fence in this area as well.
Once this was done, I used some air dry clay to make cone shapes to glue on to the end of each branch of the hydrangea tree. This will be a "Pink Diamond Pee Gee Hydrangea" which is known for its very large flower heads. Next step for this tree is to add the tiny florets all over the cones and paint them accordingly. Then I will fill all the branches with leaves.
There is still a lot to do before Saturday so tomorrow and Friday I will be working non-stop. I do not plan on having everything done by Saturday but at least enough to allow it to be displayed. After that, I will keep adding details until I am completely satisfied with it.
Coming up tomorrow - making a climbing rose for over the fence and adding more flowers to the garden. Friday will be for working on the inside of the shed. I'll be sure to update you after the Moncton show is over. Have a great night! TTFN!! - Marilyn
Subscribe to:
Posts (Atom)