Wednesday, 14 July 2021

A little of this, a little of that...

 I didn't have a lot of time for minis this week but I do have a few things to show you.  First, I mentioned in my last post that I had made a few whistles for my SIL, Jean,  who was knitting a life guard teddy bear for a client but I didn't get a picture of the finished whistles before I mailed them out. Well, Jean sent me a picture once the whistles arrived.  She has made many of these 18" bears in a variety of occupations or other special circumstances like graduates, etc.  Here is her life guard with one of the little whistles.


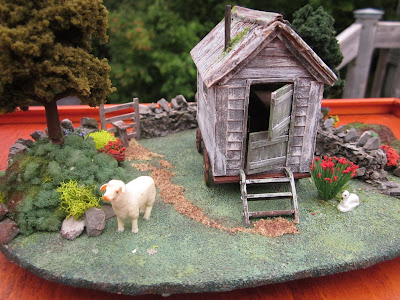
I also have some good news on the shepherd's hut front - the little lamb now has little eyes and a nose and...da ta da!!....his mommy showed up!


Michaels had a sale of sports memorabilia display cases so I bought one for a football and placed the shepherd's hut project in it.  That should keep the dust off and it has a mirror for the back wall so you can see both front and back clearly.  

Moving on, Marijke and I had  mini day through skype today.  Louise was not able to join us.  I decided to tackle those two exterior lights I had told Louise I would make for her Art Deco art gallery she is making. I mentioned what I needed to Liz at Grandpas Dollhouse and she was able to come up with a couple of suitable globes.  I also purchased some jewellery findings I thought would work.  I had a couple of brackets in my "stash".  Here are the pieces I started with, along with the inspiration picture of the lights she fell in love with.  Unfortunately, with taxes they would have cost over $300 for a pair, hence the decision to try to make a version of them for much, much less!  We didn't need them to be exact - just needed them to capture that "art deco" vibe.


First, I poured some watered-down paint into the little globes and swished it around to coat the inside for an opaque finish.  I set these upside down on some paper towel to allow the extra to drain out while I painted the brackets and the jewellery findings black.  When they were dry I painted them with a clear sealer then when dry again, glued the smaller jewellery findings to the top of the larger ones.  I then cut short lengths of the pearl beading and glued them around the globes to provide interest and to fill in the space between the jewellery findings and the globes. I painted the beads with the same colour I had used to coat the inside of the globes.  Once dry, I also used the sealer on the beads which had the added advantage of filling in the little spaces between the beads.  Perfect!

To get the aged, bronzed look of the metal in the inspiration photo, I used metallic gold paint, wiping some off the brush onto paper towel so the paint would go on with a very light hand.  I think they turned out quite well.


I actually could have finished these lights except....I couldn't find the little LED bulbs I planned on putting inside.  I think they are on my craft table downstairs which currently is hidden under about a foot of "stuff" that is set on top of them.  *sigh*  That may be my next project - cleaning up my craft room again!

So, with the brackets, I think they will probably have the art deco look we are going for.  Perhaps I will have finished pictures to show next week if I can find the darn lights.

I hope you all have a wonderful week and are able to fit some time in on your minis as well.  Big hugs to all!!  TTFN!!!! - Marilyn


Tuesday, 6 July 2021

Absence makes the heart grow fonder!

At least that's how the saying goes, isn't it??  I hope so because, at the rate I have been posting this summer, you guys must really love me by now!!!  I do notice that several of us "regulars" have been a bit sporadic in our postings lately and I know that I still love all you guys anyway so I guess all is well!

I have been allowing myself to get distracted by other things - non-mini things - so have been a little lax but, it really doesn't bother me because with summer breaking out and Covid restrictions being loosened up, I am quite happy to get out of my house and do other things.  I will probably continue to wear my mask for a few months though, even when they say we don't have to.  I would like to wait and see what happens in the first month or two before I become comfortable leaving my mask in the car.  Fingers crossed we all stay healthy and can really get back to normal.

As for minis - I did get a request from my SIL in Prince Edward Island which I was happy to try to fulfill.  She loves to knit and has spent a lot of time in the last 18 months knitting 18 inch teddy bears for people who special ordered them.  She started with graduation bears, colour coded to the graduates' schools, of course and complete with gown and diploma.  After that came requests for front-line worker bears.  She has done so many nurse and doctor bears, including scrubs and face masks.  She has gotten requests for various sports - hockey player bears, etc.  The latest request was for a life guard bear.  She wanted to accessorize the bear with a whistle to put around the lifeguard's neck but couldn't find any small ones.

So, I started with the smallest size of round "woodsies", traced around the circle unto a scrap piece of Bristol board, and made the shape of a whistle.  I cut out six outlines and glued each one to a woodsie, then I glued two pieces together for the basic shape.


Now, at this stage, I am sure you have already spied my first mistake.  I have 5 of the 6 pieces all facing the same way instead of 3 one way, and the other three as mirror images.  On to the next step - pulling 2 of the woodsies off and gluing them to the other side.  I truly am an idiot!

I am sorry to say I then got focussed on making these whistles and didn't take any more pictures.  After gluing them together in pairs, it left a gap of 5 mm.  I cut a strip of bristol board that width and wrapped in from the bottom front, around the circle and part way to the top front.  I then left a gap and glued a small strip from the space I left to the front of the whistle.  That left gap which represented the hole at the top of the whistle where the air comes through to make sound.  Of course, these whistles do not really work but the hole is there to make them look like they could.  I also wrapped the little strip to half cover the end opening at the front so the hole at that end would be narrower.  Before I wrapped the 5mm strip, I took small pieces of wire, bent them in half around a toothpick and splayed out the ends so I could glue them onto the end of the woodsies to make something to hang the whistles on a cord.  When I was wrapping the 5mm strip around, when I reached where the metal hanger was, I cut little slits in the strip and it fit right over the hanger, which I had put on lengthways, not crossways.

Once all of this was done, I painted the three little whistles with a metallic silver paint, packaged them up when they were dry, and shipped them to my SIL.  I am so sorry I did not take any more pictures of the process and I hope you can understand my description of how I made them.

So, on to other things.  In my last post, I was just beginning to tackle the landscaping for my shepherd's hut.  I started by gluing down the pieces that form the rock walls and began to cover them with tiny rocks I got from the crushed rock that forms the base of our above-ground swimming pool.


I liked the look of having some of the rock "tumble" unto the ground in front of the wall.  Oh - I also used a facecloth glued over the base and pounced on, with a fairly dry brush, 3 colours of green, some brown and some gold.


I bought a variety of landscaping material from the model railway section of our local Michaels store and, after the walls were finished, tried my hand at landscaping.  For my first try at landscaping in 1:48 scale, I am satisfied with the results but, of course, hope to do better the next time.  Here are some pics of the end result:


You'll see I found a teeny lamb in my stash which I placed by the bush at the corner of the hut.  I really need to add some little details to the lamb so it is not just a little white "blob".  And I probably should try my hand at making a teeny mommy sheep to keep this little one company.


So there we have it - one project finished.  Although, between you and I, we all know that none of our projects are truly finished because we will go back every so often and say - "Hey, maybe I should add this, change that, ......"  But, for now, I will mark it as finished (details on the little lamb to make him look a little less plastic-y, and a mommy for him will come at some point, I am sure).

So, I hope you are all enjoying the little extra bit of freedom we are starting to have and that we all have a great summer!  I will try not to let 3 weeks go by without posting again but....I had better not make any promises.  *insert sheepish grin here*.  

As for Bruce's contribution to this week's post:


Continue to stay safe and healthy everyone!  TTFN!! - Marilyn