As I mentioned a few days ago, I noticed on Maureen H.'s blog, St Albert Minis, that the Miniature Enthusiasts of Edmonton (MEE) had launched a Trash to Treasure (T2T) Challenge for their club members. They provided a list of 35 items from which participants had to choose 25 to include in their challenge entry. Also, they can use one supply item of their choice from their own "stash" but it can't be a piece of furniture or miniature accessory. Participants can use however much they want of colouring supplies (paint, coloured pencils, chalks, etc.) and glue to complete their entry and they can choose the container in which to display their final product.
This sounds like such a fun idea that I talked my mini cohorts, Marijke and Louise, to join me in trying the challenge ourselves, even though we are ineligible for the "contest" part of the challenge since we are not members of MEE. We'll send pictures of our final pieces to Maureen to share with her members. If you want to check out the "rules" of the challenge and try it out for yourself, visit this post: "Hello again! Good to be back!"
So, with my energy and enthusiasm renewed, I went downstairs to my craft room, list of the acceptable 35 items in my hand, and started trying to choose 25. At first I gathered together about 15 or so items, with no idea exactly what I would do with them.
Then I paused for a moment to figure out what I would use to put the project in. I found a few possibilities but, when my eye landed on one of those boxes that look like a book I had my Aha!! moment. I had purchased this "book" box at Michael's on sale about 5 or 6 years ago and it has been sitting on my shelf every since. I was drawn to it because of the picture of Paris on the outside, and again on the inside.


Now my brain was percolating! In my head I could see a balcony scene looking out over the square below (so the railing would be up against the back, not at the front). In the picture above you can just make out, at the bottom of the side wall, that I have started using one of my 25 choices, a piece of textured, dark green card stock paper, to look like overlapping pieces of siding on the side walls of the balcony. On the facing cover of the box, I will be using my allowable 2 sheets of computer paper. I will print an apartment interior view on one sheet and use the other to look like French doors or some kind of door that leads from the interior to the balcony.
I plan on using some pieces from the egg carton to make square stones for the floor of the balcony, and also blocks for the wall on either side and above the door on the facing cover. I will use a portion of the lid from a sour cream container as a small balcony garden space in the right corner.
Well, without telling all of the planned details, here is what I accomplished today when Louise, Marijke and I met for our Wednesday afternoon mini session via Skype.
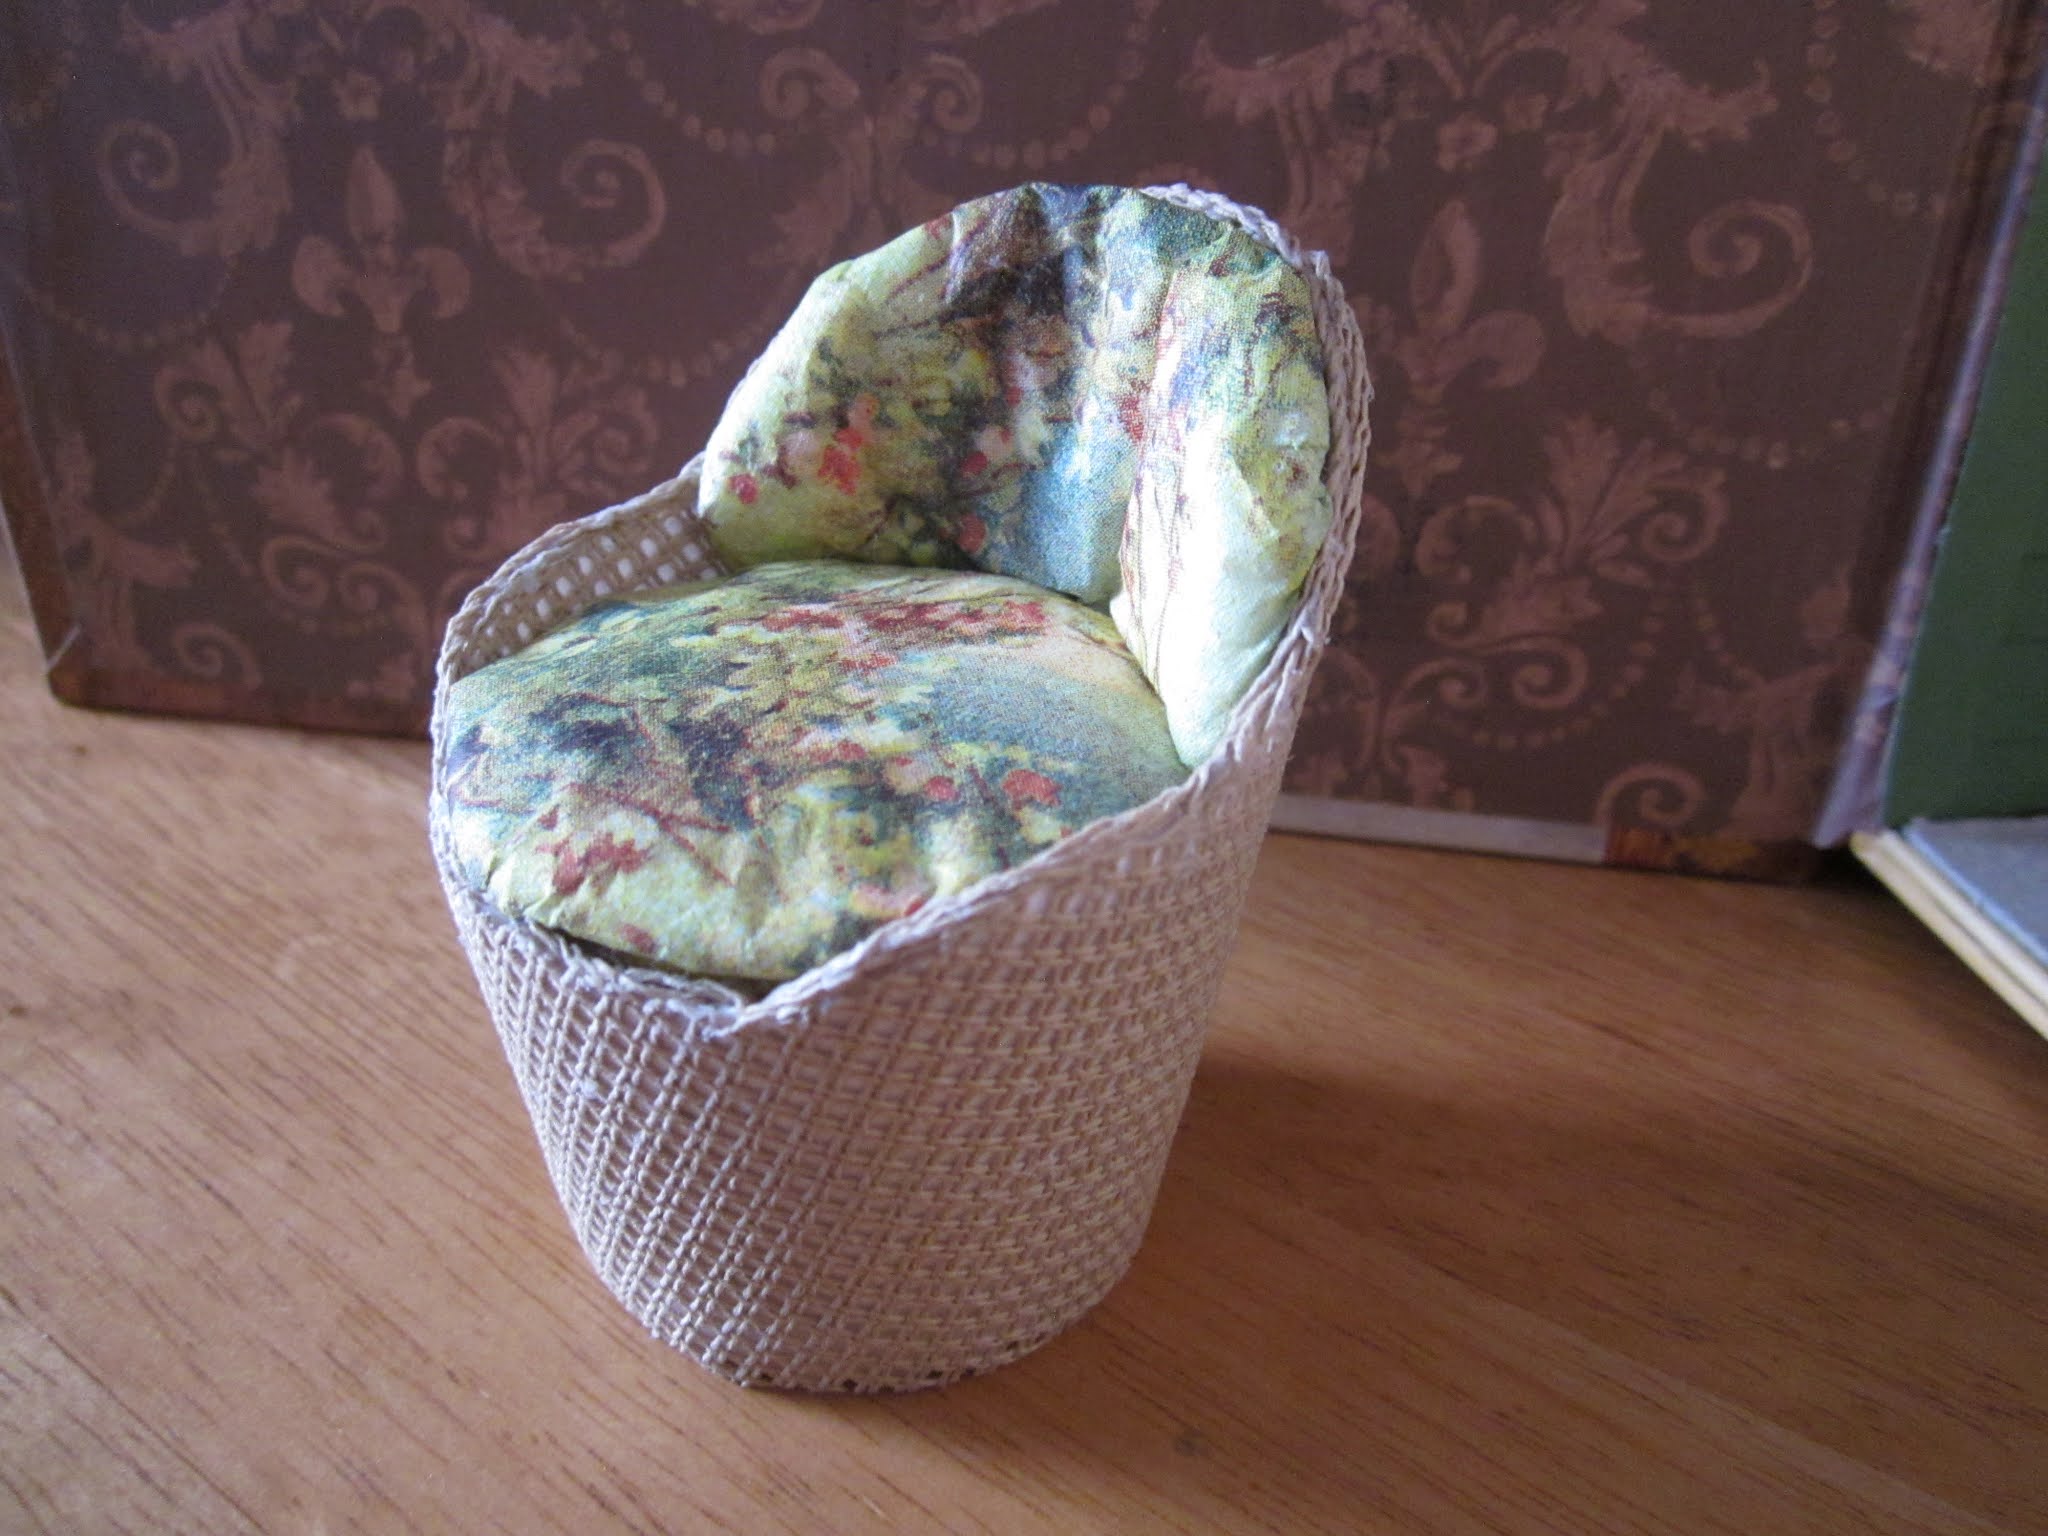
After finishing the siding on the walls, I looked at the small white Styrofoam coffee cup and thought I could probably turn it into a chair for the balcony corner. I first marked a tiny line on the bottom edge of the cup and one that matched it on the top. I placed these two marks at the edge of a piece of scrap paper and started tracing as I rolled the cup along until the marks were back where they started. That gave me a pattern of the correct arc I needed to cover the cup. I cut the rim off the cup since I didn't want it to be too high, nor did I want it to have that "bump" at the top. After cutting off the same amount from the top of the arc pattern, and wrapping it around the cup as a dry fit, I folded it in half so I could figure out the exact centre of the pattern. Knowing that a standard small chair would be 18" wide between arms and the seat would be 18" from the floor, I first marked these lines in from the sides of the pattern. Then, on one half, I continued to draw a design I thought would give me a rounded back, arms at the side and an opening at the front. I cut it out, and used the resulting pattern to mark the shape on the cup and cut it out.
I shortened the piece I had cut from the rim of the cup and glued it to the inside of the chair, to provide support for the seat, which I was going to make from a small piece of fun craft foam (we are allowed a 6"x6" piece).
My plan was to use the allowed 6" x 6" piece of fabric to cover the outside and upper inside of the chair. My choice of fabric was penelope fabric, a material used mainly for decorative needlework but, in this case, would look a little like rattan. It was at this point that I thankfully noticed one little issue. By using the pattern I had to cut out the fabric, the seam would be at the front of the chair. That would definitely not do!! It is so unlike me to to actually catch an issue before I have gone too far that I was quite taken by surprise!! So, with my new-found sense of confidence and amazement in myself, I recut the pattern so the seam would be at the back, but saved both patterns for the steps to follow.

CHEAT ALERT!!! Okay - it's a good thing I am not actually eligible for the challenge anyway because, once I had the patterns ready it became obvious that they would not fit on a piece of fabric 6x6, so, I cheated! I cut a new piece that was 6x7 instead. I'm sorry, Maureen! I just couldn't make it work!
Once I had wrapped the chair in penelope cloth, front and back, there was, of course, a gap between the two (the thickness of the Styrofoam) so I pulled individual strands out of the leftover penelope cloth, twisted them into a cord, and glued them into the gap around the edge to finish it properly.
Then I arrived at problem #2. We were only allowed 1 piece of fabric, how was I going to make the cushions for the chair? We do have a choice of a piece of felt but I didn't feel it would be the right look. We were also allowed a paper napkin or piece of paper towel. I happened to have a couple of pretty Easter napkins left over from a meeting I had been at so I peeled the 2-ply napkin apart, and found the pretty patterned part to be very soft and pliable. Perfect! I cut pieces of egg carton in the shape of the cushions I needed, pulled apart a couple of the cotton balls we are allowed and glued the pieces to the egg carton, centred them on a pretty part of the napkin and glued. I actually quite like the result.
Not too bad for a Styrofoam cup, some penelope cloth, fun foam for the seat and egg carton, cotton balls and a pretty napkin for cushions.
So, what else did I get done toward the challenge? I used a strip of fun foam, two 3" pieces of narrow suede trim and two tiny nail stickers to make a rolled up exercise mat for the fit-conscious resident of this Parisian apartment.
I also glued together an Advil cap (we're allowed 4 bottle caps), one of my ten beads, and three wooden push pins together to form the column and top of a bird bath. For the base, I used three small circles cut from the leftovers of the Styrofoam cup and a narrow strip of leftover fun foam glued together to form a base for the bird bath. I will wait for the glue to be well cured before attaching the base to the rest of the bird bath, then paint it appropriately.
So that's it for today and I will be spending the next few days working tirelessly to try to complete a birthday gift for a certain someone by her special day on Monday. After that, I will get back to work on the T2T challenge that needs to be completed by April 6th.
I hope everyone is finding a new bounce to their step and enthusiasm in their craft as we inch closer and closer to spring. I'm sending bug hugs to everyone ( in the hopes we'll soon be allowed to actually hug people again!). TTFN!!! - Marilyn